I first saw these frilly little trees from hgtv (Pinterest) and knew I had to have one (or three). They are super simple to make and have such a delicate presence sitting there on my little china cabinet.
Speaking of my china cabinet – I gave the top a new look this year. It started when I saw this old window frame with the mirrors in the panes. I was casually shopping around at The Country Pumpkin for little ornaments when I turned around and saw it. I was smitten . . . I felt dizzy . . . I needed air . . . When I came around I made the decision to leave the store for an hour or so to think about it – how responsible is that! Anyway, you can see here that the rest is history. It’s home with me where it belongs, sigh . . .
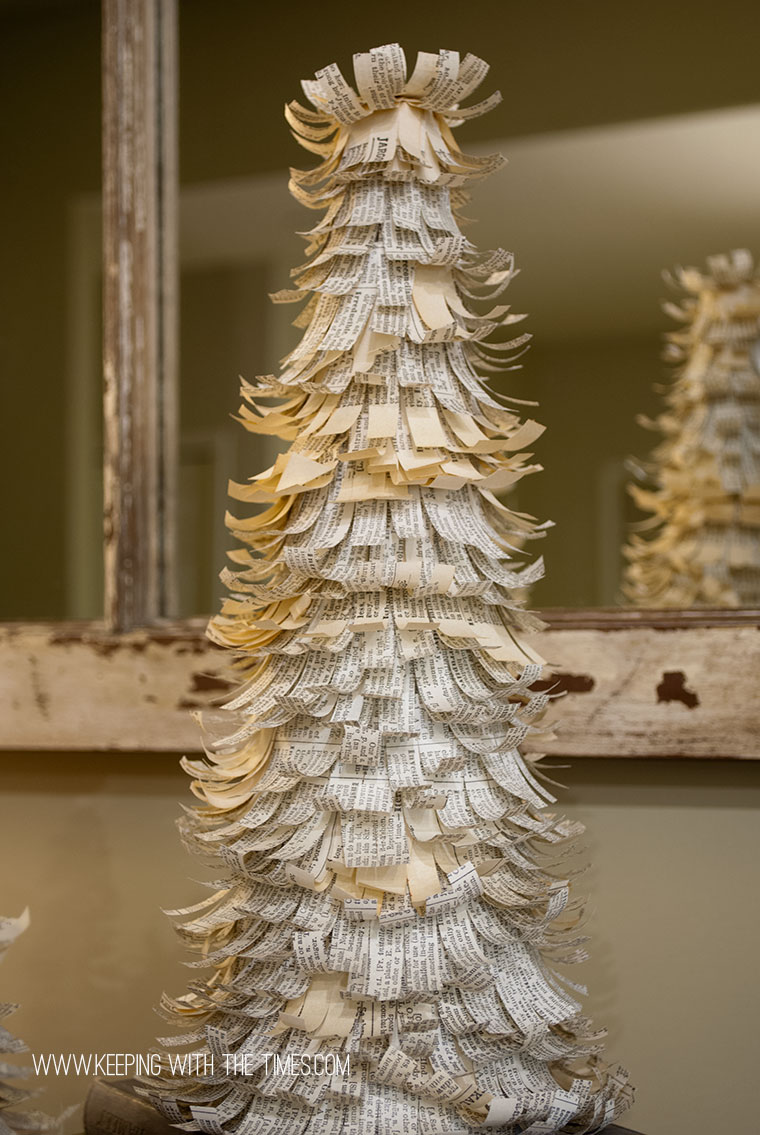
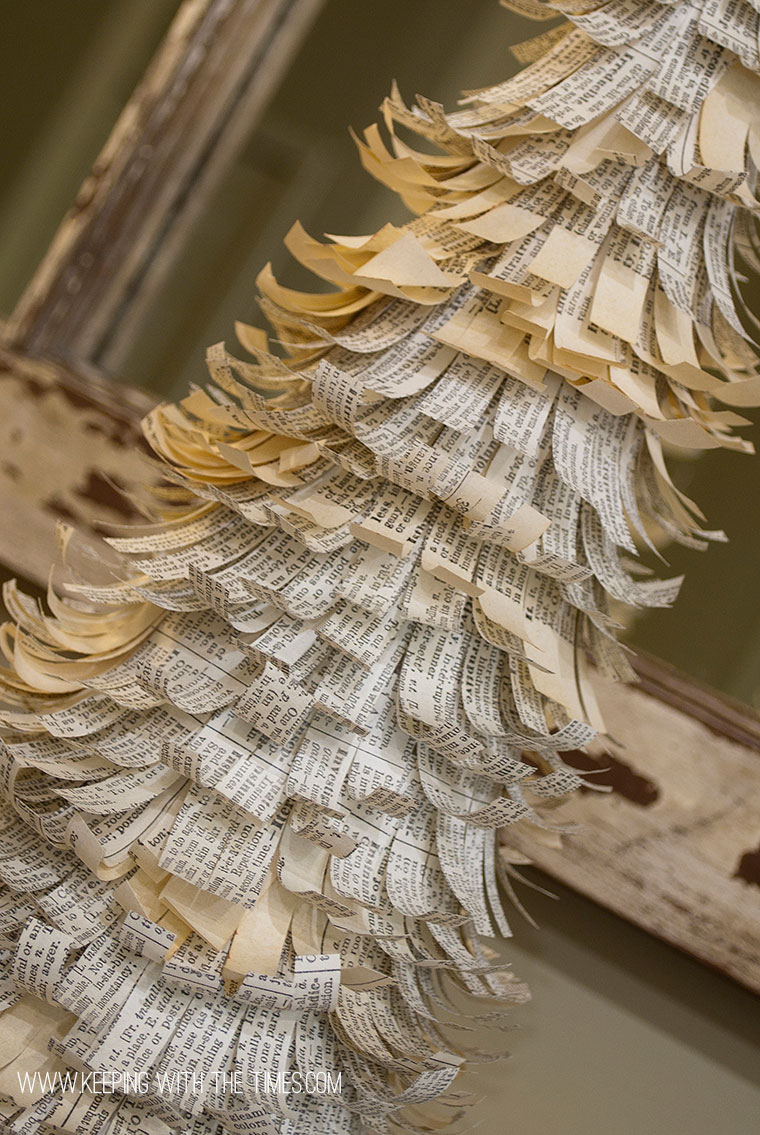
Pure frilliness!
To make the trees, I started with 3 styrofoam cone bases.
I wanted to vary the heights of my trees (two styrofoam bases are the same size and one is smaller) so I bought three little vintage books for one to sit on – is it not a.ma.zing that they match the runner to perfection? Oh my . . .

I swear, I did not see that word Kindle when I was making these trees – honest! Is that not ironic?

Love the layering going on here…

I placed a little bowl full of antique ornaments into my vignette. They came to me after we lost our sister (many years ago).

Lovin’ this window!

OK, so back to reality! Here’s a mini tutorial.
Start with styrofoam cones. Take pages from dictionary, cut into 1 1/2 inch pieces then cut lots of little frills into them, careful not to go straight to the edge.
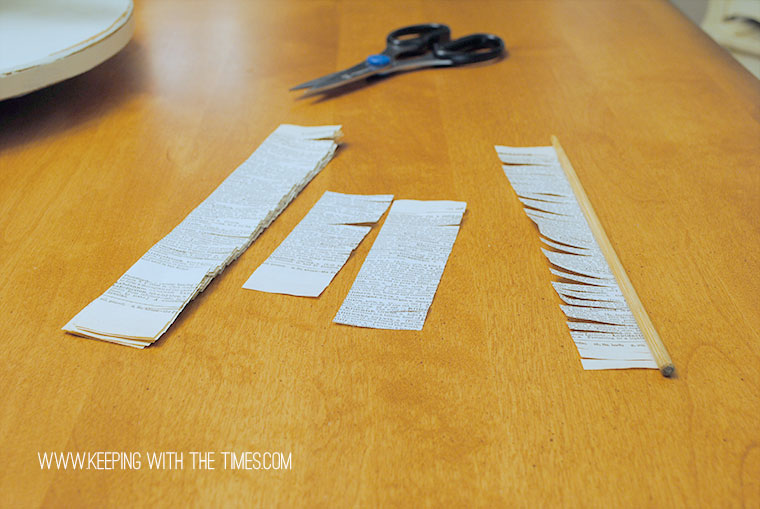
I used a thick skewer to curl them.

I found the shorter ones easier to roll.

Starting at the bottom of the cone, glue the curled pieces around it until you get to the top. I put the glue on the styrofoam base first and stuck the paper to it – it just seemed easier to handle.

These little gems are light as a feather and so, so delicate. Find a special spot for them, sit back, and enjoy! Happy decorating!
Barb, these are awesome!! I made a tree topper with encyclopedia pages cut into strips for my girls’ 4-H tree and maybe will post about it, but I just love the frilliness of these. It IS ironic that “kindle” was there!
What a fun idea – very creative!
Oh my gosh these are gorgeous! How creative!!! I can’t wait to see all of your decorating!
Jo
You rock.
These trees are adorable. Thanks for sharing~
MaryAnn
those are really beautiful. love the simplicity of it. sad that so many books are being cut up for decorations now tho! :)
I absolutely love these!
You made these???? You are an amazing paper artist….not to mention a great photographer! I am so enjoying your Christmas decoration narratives.
You are so creative! I do love that the books match the runner perfectly! Beautiful photos!
Gorgeous, Barb, gorgeous ! Thank you very very much for the Tutorial.
They turned out great. Very pretty. Love your window and ornaments too.
I agree they are very attractive. Bonus: they are quite simple to make too!
You’ve made beautiful paper trees, lovely combination with the vintage books and table runner !
Your TT photo is lovely too !
Nice evening,
Sylvia
love love love these … thanks for sharing … adding to my pinterest board so I don’t lose your tutorial!
http://pinterest.com/lorrieeveritt/holiday-crafts-and-decor/
So amusing and great. Very creative.
This is a really cool idea!
How creative ;0)
Those trees are gorgeous, this kind of christmas decoration I do like, nice work:)
Prekrasna su ti drvca, super ideja….
oh now you make this all look so easy. I would have glue all over my face, my toes, and the paper would be stuck to my rear. not kidding. I hope you’ll give us a tour of your entire, completely decorated home when you’re all finished. you must have a large supply of vintage books! I think the display is smashing. happy evening to you Barb.
Love it!
Well, I love the whole scene you put together, that old mirror in the back is wonderful, reflecting them. The runner, and the vintage books…all beautiful. DidI mention your photos are awesome too!
gorgeous project; beautiful photos!
Barb, I love your trees! I tried these last year and mine looked awful! Maybe I should try again!
tot
The photos are gorgeous and you are so very creative!
Barb, these trees are wonderful!!
Oh those are cute! They go so well with the window frame.
Love your trees! Beautiful :)
Thank you for the tutorial… they are fantastic! t.xoxo
These are great — recycling and beautifying in one easy lesson! :)
These turned out so lovely! I have made a similar one using sheet music, I’ve only attempted the one so far, though!
simply adorable…thanks for sharing!
Oh my, these are just fantastic. Love them with the vintage papers, so much character and goes so well with your “natural” decorating. Thanks so much for sharing the tutorial.
I must replicate!!! I love the grouping of 3.
They turned out awesome, thanks for sharing.
♥Linsey
Mmm. LURVE!!! These are perfect!!!
Bookmarked!
Shannon
I love the look of these trees! I just don’t think I have the patience! I’m going to pin it just in case I change my mind!
These are so gorgeous! Thanks so much for joining in on our Home for the Holidays Party!
I saw these in a high-end gift shop recently. I LOVE your tutorial and am going to try this for sure!
The different papers really add dimension to it. So cute!
Those are fantastic! And, those books do match perfectly!!! I think it would be a great addition to my Find your Craft Friday!!! I would love it if you would come link up. :)
http://thequickjourney.blogspot.com/2011/12/find-your-craft-friday-link-party.html
I really like your method of creating these trees. I’ve seen other versions out there that are not nearly as lovely. I think that it’s the detail in your fringing that really make them special. Thanks for the idea!
Love the trees!
I have some vintage paper laying around and I have to do this!I am hosting my first ever blog hop this weekend and I would LOVE if you stopped by to link some stuff up!
Kim @ Too Much Time
http://kim-toomuchtimeonmyhands.blogspot.com/search/label/get%20schooled%20saturday
Love them! Thanks for sharing!
These look like a fun craft, think I am going to have to try this!
These right up my alley! I wonder if I have the patience though… Thanks for sharing!
Okay, I got my materials together. What kind of glue did you use?
Fantastic! Thank you for joining me at Home Sweet Home!
Sherry
These are so so cute!! I am your newest follower ~ love me some Canadian blogs to read!
So pretty! I actually thought of doing something like this, although I didn’t really know how to accomplish it. But I went with a paper origami tree instead. It’s funny how much our “styles” are alike. I LOVE your mirror/window and I also used stacked books for my 3 trees! Your display looks beautiful!
Kim
http://www.todayismysome-day.blogspot.com
These little trees are great! Thank you so much for the tutorial too! I just came over from Whipperberry and I’m a new follower.
So Beautiful!
These are so pretty! I love it.
I’d love for you to link up to my Fresh Friday Link Party!
http://www.releasemecreations.com/2011/12/fresh-fridays-link-party-6.html
New to your blog and I’m pinning these- love them! Thanks for posting them.
Came across your beautiful trees on Someday Crafts. They are so elegant, and your photos are lovely too! I look forward to making some.
Love this idea! I would love for you to link up to my new party, Monday Myriad Linky Party
katieoallred@gmail.com
I always love your stuff, and am especially liking all of your christmas decorating! Time to get my butt in gear and do some…. I think i’ll start here : )
These are spectacular. I have seriously been seeing a lot of paper trees in the last few weeks, but yours are the prettiest by far! I love how they’re curly!
These are spectacular!! I’m going to have to try and do these myself! I found you through Take a Look Tuesday, and I’m following you now!
Kelly
http://crazywego.blogspot.com
Those are just AWESOME!
If you get a chance – love for you to link up to my “Made by ME” linky party: http://www.jaqsstudio.com/2011/12/made-by-me-9-linky-party-and-features.html
love your trees!!! coming over from common ground to say hi! xoox, tracie
Thank you so much for linking up your lovely projects at Get Schooled Saturday. We will be open for business again Friday night-Sunday night!
Kim @ Too Much Time
http://www.kim-toomuchtimeonmyhands.blogspot.com
What pretty little trees that look like they took forever to cut the paper for. Sweet little treasures I’m sure you’ll use forever.
Cindy
These are so sweet, thanks for the how to!
Gorgeous! I’m in love with those little trees!!!
Don’t forget to link up to win the Eureka Vacuum and Kindle Fire at “The Sits Girls!!” I am grateful to be a fellow crafter in Creating Christmas, just thought you might like a chance to win big for being oh so fabulous. :) http://www.thesitsgirls.com/featured-blogger/good-clean-fun-vacuum-kindle-giveaway/
I love the paper trees! Thanks for the tutorial. Gonna have to make some:) So pretty!
Those are pretty!
I have birch bark ones like them (though I bought them instead of making them).
Check it out:
http://turtlesandtails.blogspot.com/2011/12/christmas-mantel.html
Barb, I tried your trees. Here’s a link so you can check mine out:
http://blestnest.blogspot.com/2011/12/christmas-crafts.html
Just came across your blog – these are fabulous! Love them. I’ve pinned this and your paper wreath as well… time to get out the glue gun! Thanks for the inspiration :) xxx
So pretty! I will be featuring them tomorrow :)
XO
Just randomly found your blog! So glad I did, these trees are gorgeous! I would love it if you lined them up to my party!
http://ablondesdiylife.blogspot.com/2011/12/come-party-with-blonde-features.html
Happy Holidays!
Just stopping by to let you know I featured this project on my Christmas tree craft collection.
Please grab a featured button from my side bar when you get a chance. Thanks
http://diycraftyprojects.com/2012/11/50-diy-christmas-tree-craft-ideas-collection.html
Oh boy, I love those paper trees too. I’m going to make myself one or two or…
Best wishes for a joyous, peace-filled and creative New Year!
Hi Barb loving the paper trees can you tell me how you managed to keep the strips of paper in a straight line I have tried three times n now I’m about to give up also how did u get them so curly am I using something that’s to wide
Hi Ann, I simply cut the dictionary pages into 1 1/2 inch strips (wide) then using scissors I cut into them, being careful not to go straight to the edge. I then used a skewer to curl the strips.
So the strips themselves should start out to be about 5-6 inches long by 1 1/2 inch wide, but:
You could trim them to be about 4 inches long by 1 1/2 inch wide if that is easier. Hope this helps!