Keeping With The Times

living, learning, and keeping with the times

  • Home
  • About
  • Site Information
  • Privacy Policy

Fix Photos Fast! My Experience

June 26, 2015 by Barb 2 Comments

Have you had a chance to check out the class Fix Photos Fast with Actions by Linda Sattgast which I’m offering at a discount price?  If you are at all interested, please don’t wait … I can personally attest to the fact that you will be getting more than your money’s worth, and the offer ends tomorrow night.

Fix Photos Fast with Actions, Keeping With the Times, Actions, Linda Sattgast, Digital Scrapper

Final Image

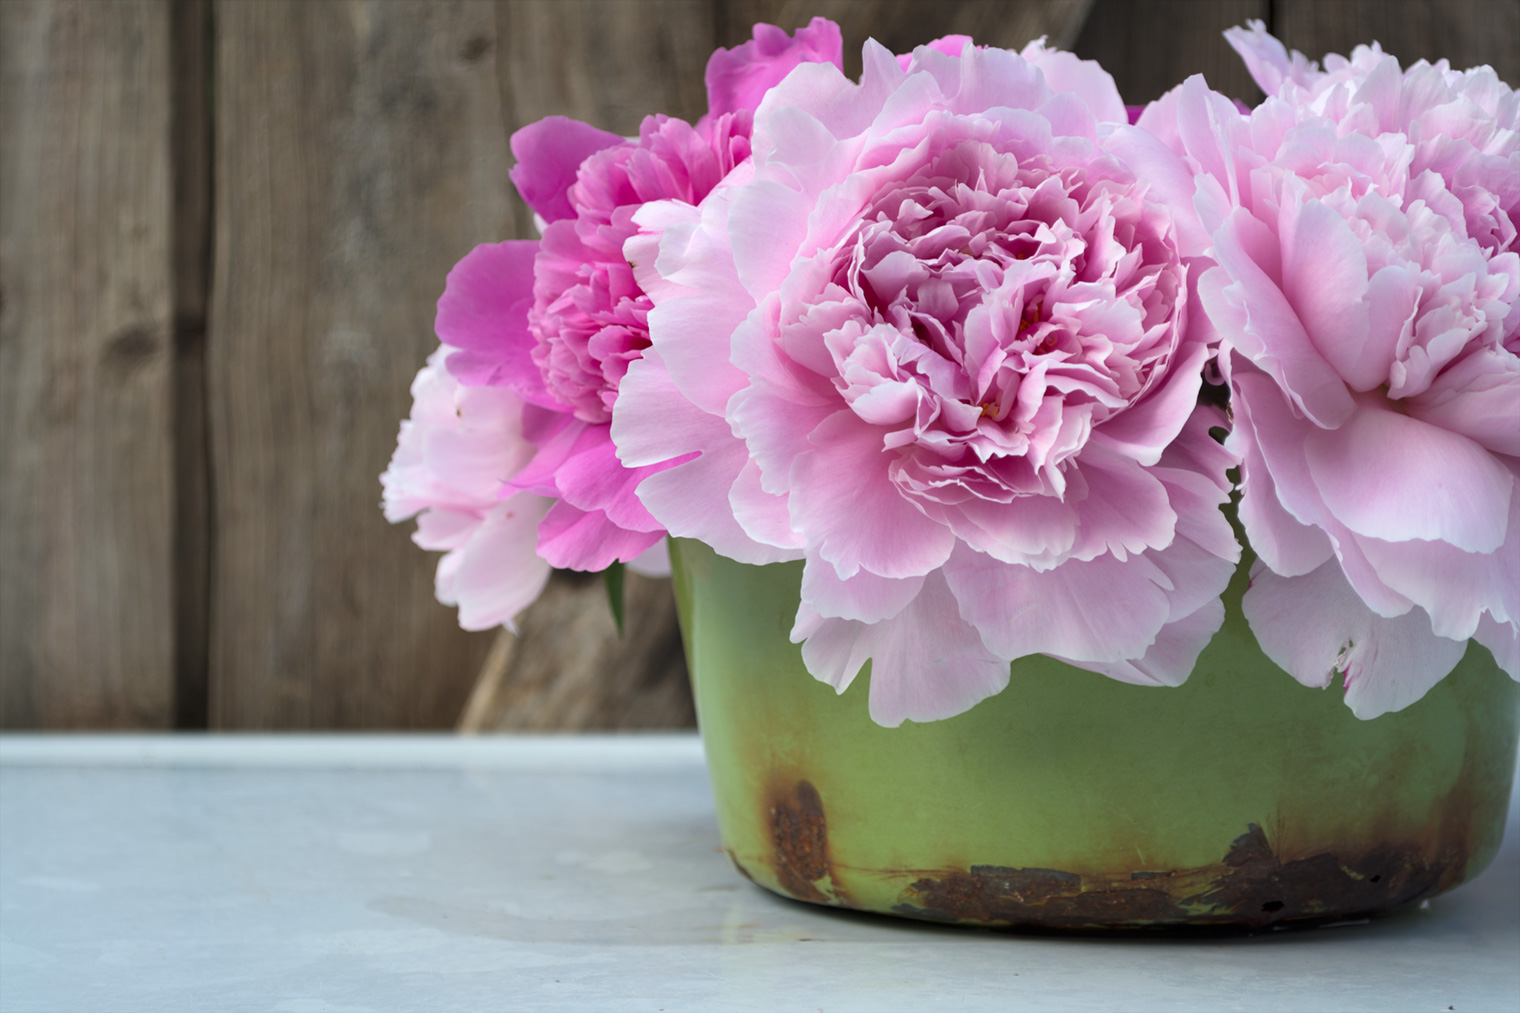
I used a few of Linda’s Photoshop actions on this peony image to create an invitation for an “imaginary” garden party I plan to hold in July ;) oh wait … I think I’m having a garden party all summer long …

Here’s my original image, straight out of camera:

Fix Photos Fast with Actions, Keeping With the Times, Actions, Linda Sattgast, Digital Scrapper

Original

I played the action “Lighter: Shadows/Highlights-minimum” and with one single click I achieved what I was going for; I wanted to lessen the shadows but I didn’t want to blow out the highlights on the peonies. Ya gotta love these results …

Fix Photos Fast with Actions, Keeping With the Times, Actions, Linda Sattgast, Digital Scrapper

Lighter_Shadows_Highlights-minimum

Then I played “Smart Sharpen-Low” and “Color: Boost” which gave just the right amount of color without being overwhelming. I could have played more using the mask to brush away some color, but I had to stop somewhere! It’s addictive and it could not be easier.

Subtle, but powerful changes:

Fix Photos Fast with Actions, Keeping With the Times, Actions, Linda Sattgast, Digital Scrapper

Lighter: Shadows/Highlights-minimum, Smart Sharpen-Low, Color: Boost

The class comes with a money back guarantee so you simply cannot lose … .

Click here to find out more about this class.

Thank you for dropping by and have a wonderful weekend!!

Filed Under: Photography Resources Tagged With: affiliate, digital scrapper, Linda Sattgast, photoshop, photoshop actions, Tutorial

Layer Mask Basics Free Tutorial

June 25, 2015 by Barb Leave a Comment

If you like adding artistic effects to your photos, I have the perfect short (approximately 6 minute) Layer Mask Basics how-to video for you.

For the Photoshop version, click here. For the Photoshop Elements version, click here.

You’ll learn how to blend a photo of an old wooden clipboard with an ordinary photo to create extraordinary results!

Start with a photo like this cute kitty sitting on a column.
Layer Mask Basics Free Tutorial

Add a photo of an old wooden clipboard above the kitty.

Layer Mask Basics Free TutorialLayer Mask Basics Free Tutorial

Change the blend mode of the clipboard layer and use a layer mask to put the slightly grungy effect exactly where you want it.

Layer Mask Basics Free Tutorial

This tutorial is especially helpful for anyone who doesn’t really understand how to use layer masks or why they’re even useful in the first place. The instructor, Linda Sattgast, says, “I use layer masks all the time when fixing or enhancing photos. It’s one of my most often used tools!”

Linda is the instructor for the Fix Photos FAST class I’m offering, so if you’re wondering whether you should take her class, this is a great way to see how she teaches.

Now through Saturday, June 27, 2015, I’m offering a discount on the Fix Photos FAST class. Click here to see my original post, and to get all the details.

Please don’t wait! This is an amazing class at an incredibly low price, and I can hardly believe Linda offers it at such a discount!

Again, for the Layer Masks Basics how-to video, Photoshop version click here. For the Photoshop Elements version, click here.

Filed Under: Photography Resources Tagged With: affiliate, digital scrapper, Linda Sattgast, photoshop, photoshop actions, Tutorial

Fix Photos Fast with Actions

June 23, 2015 by Barb 3 Comments

Actions: Fix Photos Fast! Header
As a new affiliate with Digital Scrapper, I’m thrilled to have the opportunity to offer the class “Fix Photos Fast with Actions” by Linda Sattgast, at a discount price!

But first, a little background information … I joined Digital Scrapper in March of 2009, and it has to have been one of the best decisions I’ve ever made. I’d just purchased a copy of Photoshop Elements 4 which included the “Learn Digital Scrapbooking” CD by Linda Sattgast. Linda’s teaching style is friendly, clear, and concise, and 95% of what I know about Photoshop and scrapbooking I found at Digital Scrapper. Amazingly, I went from learning Photoshop to teaching Photoshop! True story!

What if you don’t scrapbook? I say … no matter … we all use photos! We have them in our personal albums, on our blogs, on Instagram and/or Facebook … so why not make it easy on yourself (and your viewers) by using Photoshop actions to enhance them?

Click on the following image to be taken to the full class outline, and an opportunity to purchase at a discount price!

Actions: Fix Photos Fast! Class Contrast

I firmly believe in Linda and her dedicated team of professionals at Digital Scrapper, and am confident you will love this class (I know I did!)

Here’s an excerpt from the class description:

Here’s What You Get With Fix Photos FAST (by Linda Sattgast)

  • Receive my personal set of 36 time saving photo editing actions that I use constantly to fix my photos.
  • These actions are available for the following versions: Photoshop Elements 7 through 12 and Photoshop CS2 through Photoshop CC.
  • You receive both versions of this class: Photoshop Elements and Photoshop, so if you change versions, I’ve got you covered.
  • Print out my action “Cheat Sheet” to use as a quick reference until you get acquainted with what each action does.
  • For those who want more training, I’ve provided more than 25 video tutorials on various topics from how to use individual actions more effectively to my personal approach to photo editing.
  • I’ve also included more than a dozen Watch-Over-My-Shoulder videos where I go through a photo from beginning to end and tell you my thought process. In my opinion, this alone is worth the price of the class. You’ll pick up so many tidbits and ideas you may never have thought of before!

Limited Time Discount

For 4 days only this class is on sale for $10 off, so if you’re interested in a faster way to quickly fix your photos using actions,  click here to find out more about the class.

Here’s what one class member had to say:

I learned in a few weeks what I had tried (and failed) to learn in the prior 14 years.
Terri Fullerton, Michigan

This is a sample video from the Fix Photos FAST class:

Actions lighter less contrast video button

In the spirit of full disclosure, this is an affiliate link, which means I may get a commission if you decide to purchase this class. I only recommend products & systems that I use and love myself. I truly believe in Digital Scrapper.

Do you have questions or concerns? Please leave a comment and I’ll be very happy to answer them!

Click here to find out more about the Fix Photos FAST class.

Filed Under: Photography Resources Tagged With: affiliate, digital scrapper, Linda Sattgast, photoshop, photoshop actions, Tutorial

Flower Press DIY

May 11, 2015 by Barb 19 Comments

Today I’m sharing my flower press DIY. There’s a fun hashtag on IG right now called the #botanicalseries hosted by @adiandbert and @missaimeefleur, which inspired me to dig around in the storage room to find the flower press I made last year.

Flower Press How-to, Keeping With the Times

Imagine my surprise when I saw these two sprigs of Queen Anne’s Lace! I’d forgotten I’d even pressed them. Love!

To make the collage, I layered several pieces of my own handmade paper and placed the flowers on top.

Flower Press DIY, Keeping With the Times

kk_TouchaHaze

Last summer … peonies … sigh …

Flower Press DIY

At first I wasn’t going to include the following photo because I didn’t like my hands … but I think I need to celebrate them and be thankful for all they allow me to do …

Today I'm going to share a little flower press DIY with you.

Drill a hole in each corner of the wood. Do this for both pieces and make sure they line up with each other so you can put the bolts through. I would suggest drilling the holes closer to the edges than I did – mine are in a bit too far and this limits the area available for pressing.

Sand the edges of the wood to smooth, then brush lightly with paint. The next step is to cover the outside with decorative paper (I used scrapbook paper).

flowerpressdiy2 (5 of 5)

Brush the top of the board with glue and lay the paper on top.

Today I'm going to share a little flower press DIY with you.

When the glue is dry, sand the edges of the paper to distress:

Flower Press

When ready, place your chosen flowers between two white sheets of paper, then between the heaviest thin hard cardboard you can find. Here I’ve used the protective cardboard that’s included with photos (from Costco). Use as many layers as will fit between the boards (that will depend on the length of the bolts you use).

Flower Press

For each hole you’ll need one wing nut, one bolt, and two washers.

Today I'm going to share a little flower press DIY with you.

In the diptych below, the top image is the front of the press, and the bottom image is the bottom of the press:

Flower Press DIY, Keeping With the Times

If you have any questions, just ask in the comments and I’ll help you out! The is more about making the press, than the actual pressing of flowers. For further inspiration check out my Flower Pressing Pinterest Board.

What you need:

  • 2 boards of the same size (they don’t have to be square)
  • sandpaper
  • paint
  • decorative paper
  • glue
  • 4 wing nuts, 4 bolts, and 8 washers
  • white paper
  • hard, thin cardboard
  • flowers

How to:

  • sand edges of wood
  • lightly paint edges of the two boards and let dry
  • drill a hole in the corner of each piece of wood (make sure the holes line up between the two pieces of wood)
  • glue decorated paper to the outer side of the wood
  • when dry, sand edges of paper to distress

Flower Press How-to, Keeping With the Times


Filed Under: DIY AND CRAFTS Tagged With: flower, flowers, Tutorial

Hapa Zome Book Mark for Mom

May 7, 2015 by Barb 17 Comments

The technique of “Hapa Zome” just blew me away when I first discovered it on the Terrain blog.

Oh my gosh! the possibilities!!

Make one for your mom, a friend, yourself … it’s so easy, make one for a stranger!
Hapa Zome Book Mark, Mother's Day, Gift, watercolour, watercolour, pansies, botanical, Keeping With the Times

I didn’t follow the directions exactly, but what I did worked beautifully:

  • Set a flower face down on a piece of watercolour paper.
  • Cover with some parchment paper.
  • Pound with a mallet.
  • Peel away paper.
  • Peel away smashed flower … that’s it.

Hapa Zome Book Mark, Mother's Day, Gift, watercolour, watercolour, pansies, botanical, Keeping With the Times

PIN IT

Hapa Zome Bookmark, Keeping With the Times

Filed Under: DIY AND CRAFTS Tagged With: diy, flower, flowers, pansies, Tutorial

Wreath Play in Photoshop

April 29, 2015 by Barb 11 Comments

I had to have a little wreath play in Photoshop and thought I’d share it with you.

These days I’m taking advantage of every single bit of floral inspiration I see when I look out my window.

It’s a blessing to be able to stay in Arizona until the weather in Alberta turns lovely … not just spring in the technical sense, but warm, sunny, and green … sigh … I know it’s happening and I’m so looking forward to returning home … it’s starting to heat up here in Arizona—big time. I’m not complaining … just sayin’ …

Now, on to my wreath …

White Space

or is it two wreaths … you tell me …

Wreath Play, Keeping With the Times, Photoshop, tutorial, blend modes

I’m guessing you sense there’s a bit of trickery going on here since “Photoshop” is part of my blog title. OK … here’s the scoop.

I created a wreath on a piece of white foam core and took a few shots in Auto mode … er … yes … I used Auto (and why not?) it gave me the sharpest image.

In Lightroom:

I adjusted exposure using Auto Tone, then did a bit more tweaking to get the colours brighter, whiter, and sharper.

With the Tone Curve tool I clicked and dragged in the white part of the photo to whiten the background as much as I could without blowing out any of the whites in the flowers or the wire frame.

I exported the image to Photoshop and dragged it onto a new 12in x 12in, 300ppi document. I duplicated it and moved the duplicate into the upper right corner … looks weird right?

Snip20150429_1

Here’s the magic, change the blend mode of the top image to Multiply:

Snip20150429_3

How fun is that?! When using the Multiply blend mode in Photoshop, areas on a layer that are pure white completely disappear from view!

I did have to tweak the white backgrounds again in both images, and used a bit of layer masking to hide edges but really the initial effect is pretty good.

When I posted it on Instagram I suddenly lost my mind and went off the rails … and created a kaleidoscope (not once but twice). I’m not sure how much it was appreciated, but I had fun!

I hope you enjoyed my little Photoshop tip today!

wreath_play_final


Filed Under: Artful Photography, Still Life Tagged With: photoshop, photoshop tips, still life, Tutorial

Home Decor Styling Tips

April 1, 2015 by Barb 23 Comments

April made a typical entrance again this year: Friday, March 31st … one of the most beautiful days ever … warm, sunny, calm, and then … boom. Overnight the winds picked up and by morning they were absolutely howling. At 6:30 am the power went out and by 9:00 am snow was being driven sideways across the yard. Yep … spring in Alberta … aaarrrgh.

Lucky for me I had risen early and made my coffee, so I was sitting on the sofa, bundled up in fleece blankets, sipping a hot cuppa, and feeling grateful.

As the first slivers of morning lit up the sky, I watched the outside world come into my view. The barnwood tables and benches that I had set up on the deck in preparation for the new season sat sturdy and solid … waiting.

Earlier in the week I’d picked a ton of pussywillow. Some I’d set in a stoneware pot and was happy to see it hadn’t blown away. The new wreath I’d made was safely stowed against the house, under the overhang, and was no worse for the wear. Whew!

So even though our first day of April was atrocious (weather-wise) I spent it happily creating my spring willow wreath vignette, and came up with some home decor styling tips while I was at it!

I love an uncluttered look, but even so, there’s a lot going on here.

The wreath is hung in the centre of the wall with a small vintage chest and chair underneath. I placed the yellow birdhouse on several books to give it height and then used a yellow/green runner to draw the eye across and to the yellow pillow. Can you spot the repeating shape here?

So here’s my little still life mimicking life … or is life mimicking still life?

Home Decor Styling Tips, Keeping With the Times

Home Decor Styling Tips, Keeping With the Times

Do you not just love the little botanical print above the chair? Adore!

I was searching for books at Amazon and came across this little gem “Instant Wall Art – Botanical Prints: 45 Ready to Frame Vintage Illustrations for Your Home Decor.” So cute and fun! Botanical prints are hot by the way … .

Home Decor Styling Tips, Keeping With the Times

Side note: I saw pussywillow branches for sale at Terrain for $48.00/bunch! Gah … choke … eek …

Home Decor Styling Tips, Keeping With the Times

Try to incorporate meaningful items in your vignettes. A few of my favourite books include “In Detail”, “A Life Less Ordinary”, and “Vivian Maier Street Photographer”. I have so many amazing books, I could have stacked a dozen more, but it would have ruined the effect—less is more.

Mix old and new, organic and inorganic elements, but keep colour tones similar.

Home Decor Styling Tips, Keeping With the Times

Making a pussywillow wreath is super simple! Buy a ready-made willow wreath at any craft store and proceed to stuff it with pussywillow branches! If you need a little more detail, check out my instructions here.

Home Decor Styling Tips, Keeping With the Times

And last but not least, I’ll be sending the link to a full resolution copy of my little botanical print “Hyacinth, Willow and Tulip Play” in my next newsletter!! If you haven’t signed up, check the sidebar for details!

Thank you ever so much for stopping by!

All images edited in Lightroom
Presets by Kim Klassen
kk_breeze
kk_within


Spring Willow Wreath Vignette, Willow, Pussywillow, Wreath, DIY, Decor


Filed Under: HOME DECOR Tagged With: diy, lightroom, pussy willow, spring, still life, Tutorial, wreath

How to Create a Project Gallery Part III

March 14, 2014 by Barb 5 Comments

How-to-Create-a-Project-Gallery-in-WordPress-Part-III

If you’re new to this series, I’d suggest that you check out Part I, and Part II, before continuing on.

Create a Page

  • From the Dashboard, choose Pages > Add New, and give it a name. I’m calling mine PIES.
  • Click Publish. Don’t worry, it won’t automatically appear on your blog.

Create a Gallery

  • Open your blog in another tab on your browser. Navigate to a post that you want to link to the Gallery, and copy the URL.
  • Go back to the Page and click Add Media, then click on the Media Library tab. Find the image that goes with that post. You can search for an image and it’s especially easy if you gave that image a descriptive name when you saved it. I searched for “pear” and this is what popped up.
  • Click on the image you want to use as a thumbnail to select it.

WordPress Gallery Tutorial

  • In the Attachment Details, paste the URL in the Gallery Link URL box.
  • Choose New Window for the Gallery Link Target. You always want to open links in a new window – always!
  • IMPORTANT: Because this is the first link, you have to click Create Gallery on the LEFT Side of the screen, and then once you have all the information filled in, click Create a new gallery in the Attachment Details (as shown in the image below).

Create a WordPress Gallery

  •  You will be taken back to the Page and you should see the thumbnail.
  • Click on Caption this Image, and give it a name.

WordPress Gallery Tutorial

  • In the Gallery Settings, choose Link to Attachment Page.
  • Choose the number of columns that you want. I like to have 5 columns.

WordPress Gallery Tutorial

  • In the Attachment Details, click Insert Gallery.
  • You will be taken back to the page, and a blue box will have appeared. This is your gallery.

WordPress Gallery Tutorial

Edit the Gallery and Add More Links

  • Click on the Blue Box to activate the Gallery and then click on the Edit Gallery Button that appears (not the red Delete Symbol!)

WordPress Gallery Tutorial

  • Click Add to Gallery, then repeat the same steps to add the rest of your links as desired. Click Update Gallery when you are finished, then Update your Page.

Add The Page to the Menu Bar

  • Choose Appearance > Menus. In the Pages dialog box, click the box next to (PIES) “Your Page Name” to select it and choose Add to Menu.
  • Click Save Menu. Go to your blog (refresh the page) and check it out, you should now see the new Page on the Menu Bar. Congratulations! that’s the start of your first gallery!

So there you go! That’s how to create a Gallery in WordPress using the WordPress Gallery Links plugin.

Filed Under: BLOGGING BITS AND BYTES Tagged With: blogging, Tutorial, wordpress

How to Create a Project Gallery Part II

March 12, 2014 by Barb 3 Comments

In Part I of my series on setting up a Project Gallery, I went over some reasons on why it is a good idea to have one, and what you can do with it.

Today I’m going to give an overview of the process, and outline the steps because there are quite a few (but don’t be put off by that).

Slow and steady.

Create a project gallery using the WP Gallery Custom Links plugin.

But first, I want to talk a little bit about the WP Gallery Custom Links plugin vs Inlinkz.

I’ve used InLinkz (Project Manager) since I started my blog in 2010. I was on Blogger at that time and then migrated to WordPress in January of 2013. Inlinkz came with me and I have to say it is a really great tool. It has a lot of different applications but I use it solely to create galleries. So what’s the big difference? Well for me, it’s ease of use, and control.

InLinkz is an off-site application where I go and create a database of links that point to my blog. I go to InLinkz, sign in, add my links, get the code, copy the code and then paste it into a page in my blog. On a side-note, InLinkz charges for some of their services and indeed they should. Someone has to bring home the bacon, right? And I would pay for it if I was going to continue using it. Right now I have 74 free links to go, after that I have to pay a monthly fee. No big deal, but …

The WP Gallery Custom Links plugin is installed on my blog. It’s free (but you can make a donation to the developers), and I don’t have to leave my blog. I have complete control of my links and my images. All the images that are on my blog are now saved on the server at HostGator. My blog is self-hosted; it’s not a WordPress.com blog (there’s a big difference).

OK! Enough of all that. As promised, here’s an overview of where I’m going with all of this!

  1. Download and install the WP Gallery Custom Links plugin.
  2. Create a Page.
  3. Add the Page to the Menu Bar.
  4. Create a Gallery.
  5. Add more images to the Gallery.
  6. Add another Gallery to the Same Page.
  7. Create a drop-down Menu.

First of all, if you haven’t already, back up your blog!!

How to Create a Project Gallery using the WP Gallery Custom Links Plugin

Download and install the WP Gallery Custom Links plugin:

  • Go to the Dashboard.
  • Click Plugins.
  • Choose Add New.
  • Search for WP Gallery Custom Links.
  • Click Install Now. That’s it! It’s installed and you are ready to go.

So that concludes Part II of my series. Please join me on Friday where we will really get down to business!

Hope to see you then!

How to Create a Project Gallery Part III

Filed Under: BLOGGING BITS AND BYTES Tagged With: blogging, Tutorial, wordpress

How to Create a Project Gallery (and 5 Reasons You Should Have One)

March 10, 2014 by Barb 10 Comments

Today I want to talk about how to create a project gallery using the WP Gallery Custom Links plugin, and why you should use galleries.How to create a project gallery using WP Gallery Custom Links Plugin, Keeping With the Times, Blogging Bits and Bytes, WordPress

Many of us have some type of navigation system, typically situated at the top of our blogs in the form of tabs, or pages, etc.

There are also Archives, or Categories, or Search Functions, which are usually found in the sidebar. These are all fantastic tools to help your reader find what they are looking for.

A Project Gallery is simply another way to organize and promote your work, and is used for many of the same reasons as Archives, etc.

So why should you have a Project Gallery?

  1. Your best posts aren’t lost forever. You put a lot of work into them, why should they have only 15 minutes of fame?
  2. It gives readers a convenient visual tool, and people respond better to visual prompts.
  3. It keeps you organized.
  4. It’s not just for home projects or recipes. I also use it to organize Blogging Tips, Photoshop Tips, Word Art, and Photo Art.
  5. If done right, it adds a feeling of professionalism to a blog.

My blog is set up using the Genesis Framework and the Lifestyle Child Theme.

In a series of posts, I’m going to share how I created a Project Gallery (with drop-down capabilities) in WordPress using the WP Gallery Custom Links plugin. I am not a technical guru or an expert in WordPress, or the WP Gallery Custom Links plugin. This is based solely on my experience. Please take that under consideration before doing anything drastic to your blog!! Oh, and make sure to back up your blog before installing any new plugins!!

This is an example of what you can do with this plugin. You can put a Project Gallery anywhere (well, almost anywhere).

My Arizona Holiday (click on an image to be taken to that post)

Barrio Viejo Tucson
Doors of the Barrio Viejo
https://www.keepingwiththetimes.com/2014/02/theres-a-new-app-in-town.html
There’s a New App in Town
Doors of Tucson
Doors of Tucson
Butterfly Wonderland
Cactus, Arizona
10 Things I Love about Arizona

So that concludes Day 1 of my series on Creating a Project Gallery.

Please come back on Wednesday, where I’ll go over my thoughts on InLinkz vs. this plugin. At the moment I’m using both systems, but I’m slowly drawing away from InLinkz and I’ll tell you why. BTW, I think InLinkz is a fantastic tool, I’m just ready to move on.

In the meantime, back up your blog!!!! I can’t stress that enough. It’s just good practice.

How to Create a Project Gallery Part II

Filed Under: BLOGGING BITS AND BYTES Tagged With: blogging, Tutorial, wordpress

How to Write an Action to Re-size and Save Images for your Blog and a Special Offer

February 16, 2014 by Barb 25 Comments

Writing Actions in PhotoshopI’m pretty sure most of us know that our images need to be re-sized before uploading to the web. The photo needs to fit within the width of your blog, and it needs to load fast or you will lose readers. True story.

I’m no expert on this subject, but I found a great article at photoshopessentials.com which gives an in-depth look at why, and how to do it. It’s very informative and enlightening and explodes a few myths about size, resolution, etc.

However, I thought I’d go over how I do it and show you how to write an action to automate this task. One click of a button and your image is re-sized and saved in a folder. Perfectly sized and hard for someone to steal it for printing purposes, although they could steal it and use it for the web, but that’s just not cool.

Actions can only be written in Photoshop, but don’t despair, I have a little surprise for you and you’ll find it at the end of this post.

Since Photoshop CC has a bit different dialog box, I wrote this action in CS6. So here we go:

How to Write an Action in Photoshop to Re-size and Save Images for Your Blog

To start with, make sure you have a folder created where you want to save your re-sized images.

  • Open a photo that you have already adjusted exposure, white balance, and cropped etc. Make sure all your edits are complete before re-sizing.
  • From the Actions panel, make sure that Button Mode is not checked. Actions can’t be written in Button Mode.
  • Click on the down-facing arrow and choose New Action. In the Dialog box, type in the name you want to use for your action. I’m using the name “Resize and Save for Web”.
  • Choose Default Actions as the Set. This will save the Action in the Default set (of course). You can create your own sets, but I won’t go there right now.
  • Choose None for the Function key, and choose a Color if you like. This will give the Action a Color when in Button Mode. For this Action, I did not choose a color.
  • Click Record. Everything you do from now until you press the Stop key will be recorded. It doesn’t matter how long you take, PS will sit there and wait all day if it has to so you can go slow and make sure you take only the steps that you want recorded.
  • In the Menu Bar, choose Image > Duplicate, and click OK.
  • Choose Image > Image Size.
  • Make sure that Scale Styles, Constrain Proportions, and Resample Image are checked.
  • Click on the down-facing arrow and choose Bicubic Sharper (best for reduction).
  • Set the Resolution to 72 Pixels/Inch.
  • For the Pixel Dimensions, set the Width. I set the width to 760 Pixels/Inch because that is the maximum width for images that will fit on my blog. Yours will most likely be different. Accept the Default Height to maintain proportions. Click OK.
  • In the Menu Bar, choose File > Save for Web. Choose JPEG, Medium with a Quality of 45. Click Progressive. I left the rest of the settings at the Default. Click Save.

Free Photoshop Action

  • Navigate to folder where you want to save your re-sized images. Accept the default name of your image. If you give it another name, the action will save every image with that name and of course will end up overwriting every image you run the action on.
  • Close the duplicate image, then close the original image (do not save the changes).
  • Click the Stop key.

Here are the final Pixel Dimensions for my image. Notice that the file size went from 28.7M to 1.11M. The other thing to note is that I do not touch the Document Size dialog box when re-sizing. It gets reduced automatically.

Free Photoshop Action

Clean as a whistle and faster than a speeding bullet!

But the fun part today is my little give-away! I will write a custom action for the first 10 people who comment. I can only record it to the point of re-sizing the image since I can’t create a path to a folder on your computer. Once you run this action on an image, you will have to then save it yourself.

If you want a custom action, make sure you say so in the comments, and make sure that I can contact you.

You give me the info – I give you the action!

Want a few more tips on Photoshop? Check out my page “Photoshop Tips”!

Have a wonderful Sunday!

Filed Under: UNCATEGORIZED Tagged With: blogging, freebie, photoshop, photoshop actions, Tutorial

Beautiful Autumn Tansy Wreath

September 19, 2013 by Barb 15 Comments

Tansy Wreath

Tansy Wreath

I’m always scouring ditches for treasures (flowers, moss, wood, you name it), and one of my favourite flowers is the wild Tansy. It’s abundant, beautiful, free, and it makes for a lovely wreath, or bouquet.

I know that in some parts, it’s considered invasive…

Early Autumn Wreath

but I say, invade… (perhaps farmers do not)…

Tansy Wreath

Tansy Wreath

To make the wreath, I simply clipped off the flower heads and pushed the stems into a willow wreath that I purchased at Michaels.

Start at the bottom and push the flower heads up the left side of the base, then up the right side of the base until they meet at the top.

At the bottom, I created a little spray by pushing the flowers in from the left, and in from the right, and then secured them with some twine. Easy Peasy!

keeping with the times

Definitely a country bouquet.

Tansy Wreath

Filed Under: DIY AND CRAFTS, HOME DECOR Tagged With: flower, Tutorial

Welcome! I'm Barb, and this is where I practice my mantra to "learn something new, try something different". It's my hope that something I do here may inspire you! Read More…

Categories

Archives

Copyright 2020 * Keeping with the Times * All rights reserved.