Keeping With The Times

living, learning, and keeping with the times

  • Home
  • About
  • Site Information
  • Privacy Policy

The Travelling Hydrangeas (and what they taught me)

April 24, 2017 by Barb 11 Comments

Last week when I purchased a pot of hydrangeas we were four days from packing up and leaving Arizona to head back home (a 2900 kilometre drive). We were also expecting our oldest daughter for a visit and had made plans that would fill just about every minute she was here. From the Grand Canyon, to shopping, to hiking, there was not going to be much time to appreciate these beauties.

Hydrangeas, The Travelling Hydrangeas, How to Care for Freshly Cut HydrangeasSo … the story … we were in Fry’s grocery store getting a few provisions. It was just before Easter, and their flower section was full to overflowing with magnificent blooms of all kinds including massive pots of hot pink hydrangeas.

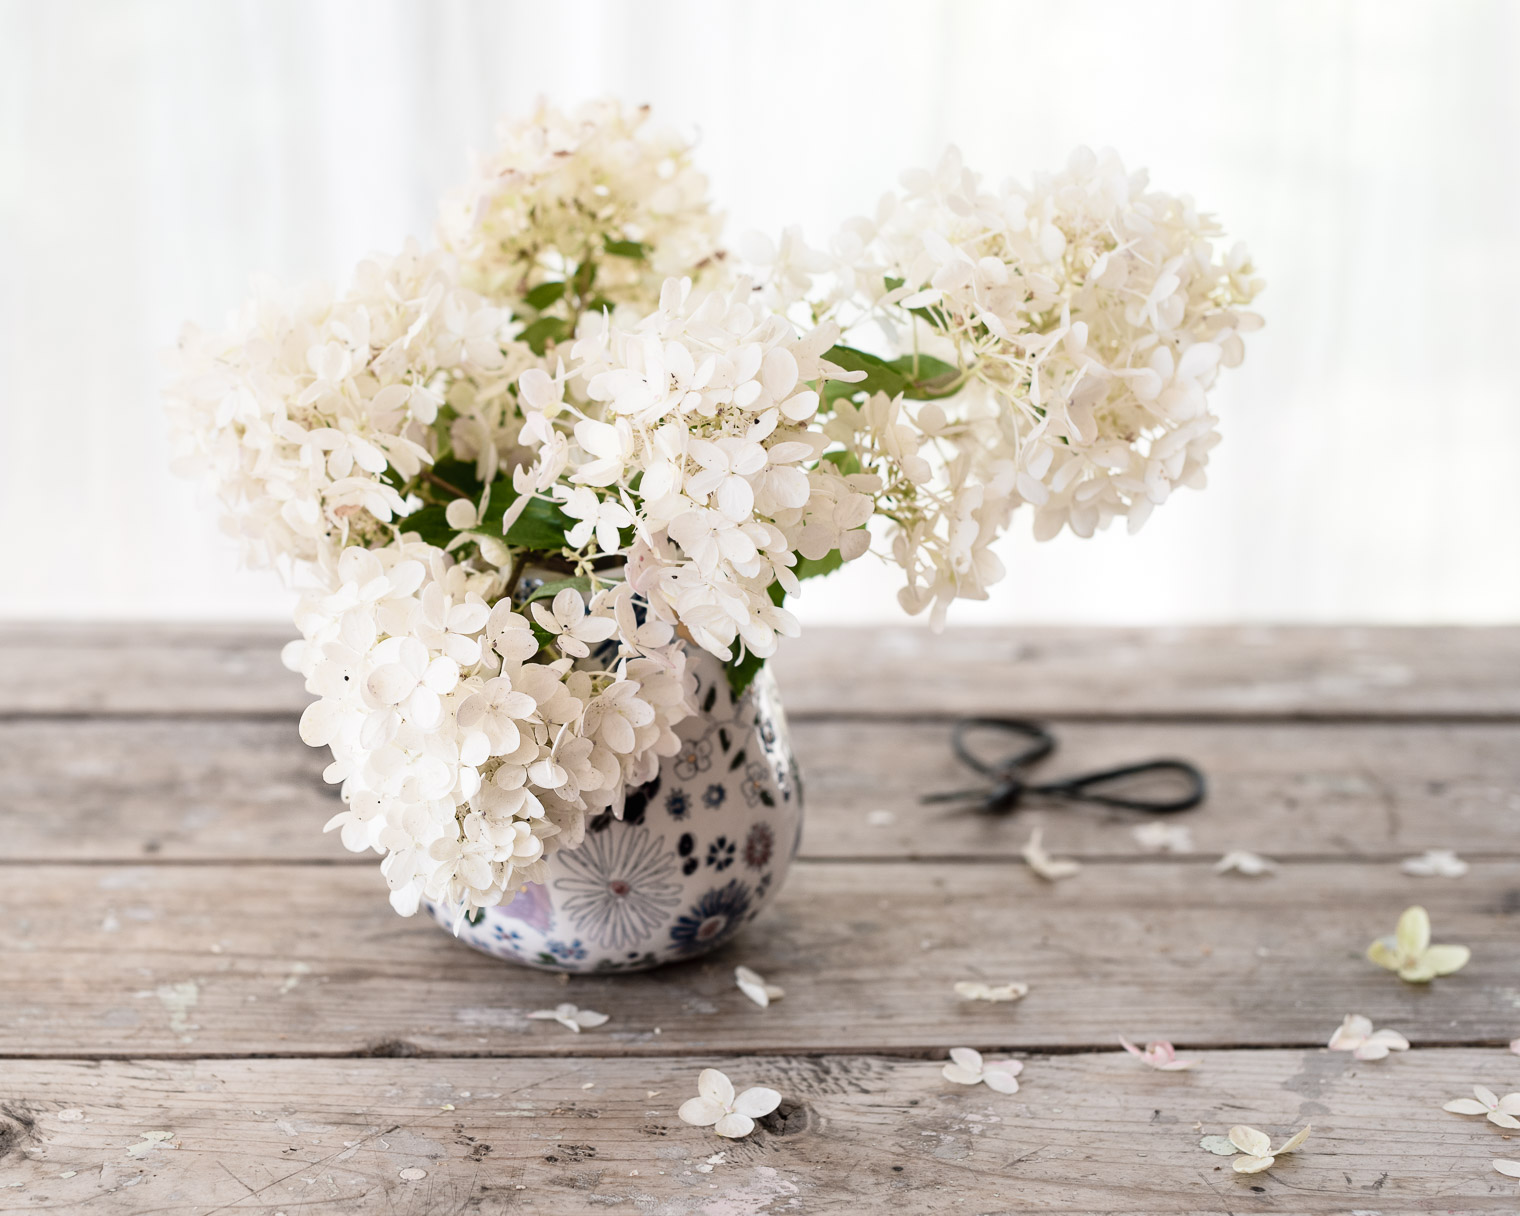
As I picked one up and put it in our cart, my head was telling me not to do it. But my heart was saying yes, yes, yes. So I did. And for a few short days it sat on our rustic side table, bringing beauty and life into our townhouse. I had no regrets.

But when it came time for us to lock up and leave, I was having a hard time imagining throwing it out. Oh, I could have given it to a neighbour, or left it for the lady who checks our place. Both options would have been good ones. But … I wanted those hydrangeas. And why not?

Well, one of my main fears is taking any type of organic material across the border. We travel a lot, and the last thing we want is a hassle at the border so there is nary a thing in our suitcases or vehicle that could be cause for us to be pulled over (either at the airport or the land crossings.)

But this particular morning I felt it was time to assert myself and take a chance. So I cut the flowers off the plant and stuck them in a bucket of water … and … 2900 kilometres later here they are, sitting on my garden table in the dining room!

Hydrangeas, The Traveling Hydrangeas, How to Care for Freshly Cut HydrangeasIt seems like such a small thing, I know … but what the travelling hydrangeas taught me is that I have to think for myself. Take chances. Just do it (no apologies.) Truly, this is about as rebellious as I get … and that tells me I need to be more rebellious!

The guard at the border didn’t even ask the standard “fruits, vegetables, or meats?” question. He was only concerned that grammy and grampy might be transporting firearms or liquor ;)

You might also like:

How to Care for Freshly Cut Hydrangeas (one of my most popular posts!)

Filed Under: FLORAL DESIGN Tagged With: floral tips and tricks, flower arranging, hydrangeas

Heavenly Autumn Hydrangea Bouquet

September 1, 2016 by Barb 11 Comments

Never before have I been able to make a hydrangea bouquet from my own garden! I didn’t even realize they are a late summer to early autumn bloomer because there never were any blooms to speak of!

Apparently they need partial shade and rich moist soil (explains why I planted it where I did). But over 5 years waiting for it to bloom?

Hmmm … it’s been a looong wait people but how divine it is, with it’s feathery white and pink-tinged flower heads.

Hydrangea Bouquet, Late Summer Arrangements Idea #3, Hydrangea Heaven, Keeping With the Times
I don’t remember what type it is, but I’m guessing it’s a PeeGee.

I just read that some people think it belongs only in the compost heap! How sad … they must not live north of the 49th … .

This is a simple bouquet, so I would recommend you place it in a lovely vase, like this one from Anthropologie. It gains a bit extra presence as a result.

However, I think it would look equally as lovely in a plain glass vase (but I’m from up North, right?)

Hydrangea Bouquet, Late Summer Arrangements Idea #3, Hydrangea Heaven, Keeping With the Times

… and it goes lovely with tea …

Hydrangea Bouquet, Late Summer Arrangements Idea #3, Hydrangea Heaven, Keeping With the Times
Hydrangea Bouquet, Late Summer Arrangements Idea #3, Hydrangea Heaven, Keeping With the TimesHappy September everyone!

This is Part 3 of my Six Late Summer Arrangements Ideas:

Late Summer Arrangements Idea #1

Late Summer Arrangements Idea #2

Filed Under: FLORAL DESIGN Tagged With: backyard bouquet, flower arranging, hydrangea

Late Summer Arrangements Idea #2

August 29, 2016 by Barb 9 Comments

The second of my late summer arrangements is the Beautiful Bouquet Garni!

So what is bouquet garni? Well, it’s traditionally a bundle of fresh herbs such as bay leaf, thyme, and parsley, tied together with string, and used to flavour soups and stews. Alternately the herbs are placed in cheesecloth and tied into a small sachet which is placed into the pot. The sachet makes for very easy removal when the dish is finished cooking.

Late Summer Arrangements Idea #2, Beautiful Bouquet Garni, Keeping With the Times

My selection of herbs for the bouquet garni …

Late Summer Arrangements Idea #2, Beautiful Bouquet Garni, Keeping With the Times

Yesterday I tied a few herbs into a sachet and threw it into the crockpot with some beef broth and every single old vegetable I could find; either from the fridge or freezer. I was pleasantly surprised at how flavourful and full-bodied the broth was.

So my plan now is to make extra broth to freeze for autumn and winter … I’m thinking it’s just another great way to preserve the overabundance of herbs I have this year.

You might also enjoy:

Late Summer Arrangements Idea #1: The Succulent Sedum Sensation

Late Summer Arrangements Idea #3: Heavenly Hydrangea

Filed Under: FLORAL DESIGN Tagged With: backyard bouquet, flower arranging, herbs

Late Summer Arrangements Idea #1

August 26, 2016 by Barb 18 Comments

Because my floral choices are seemingly becoming quite sparse, I challenged myself to create six late summer arrangements just to prove there is still a ton of beautiful flowers and foliage out there; both in my garden, and in nature.

I came up with this idea after seeing it on The BLOG at Terrain. Oh I adore this blog … did you know they’re a part of Anthropologie? So inspiring!!

The first of my late summer arrangements is The Succulent/Sedum Sensation ;)

I raided my garden and flower pots for this one …

Late Summer Arrangements #1, The Succulent/Sedum Sensation, Keeping With the Times
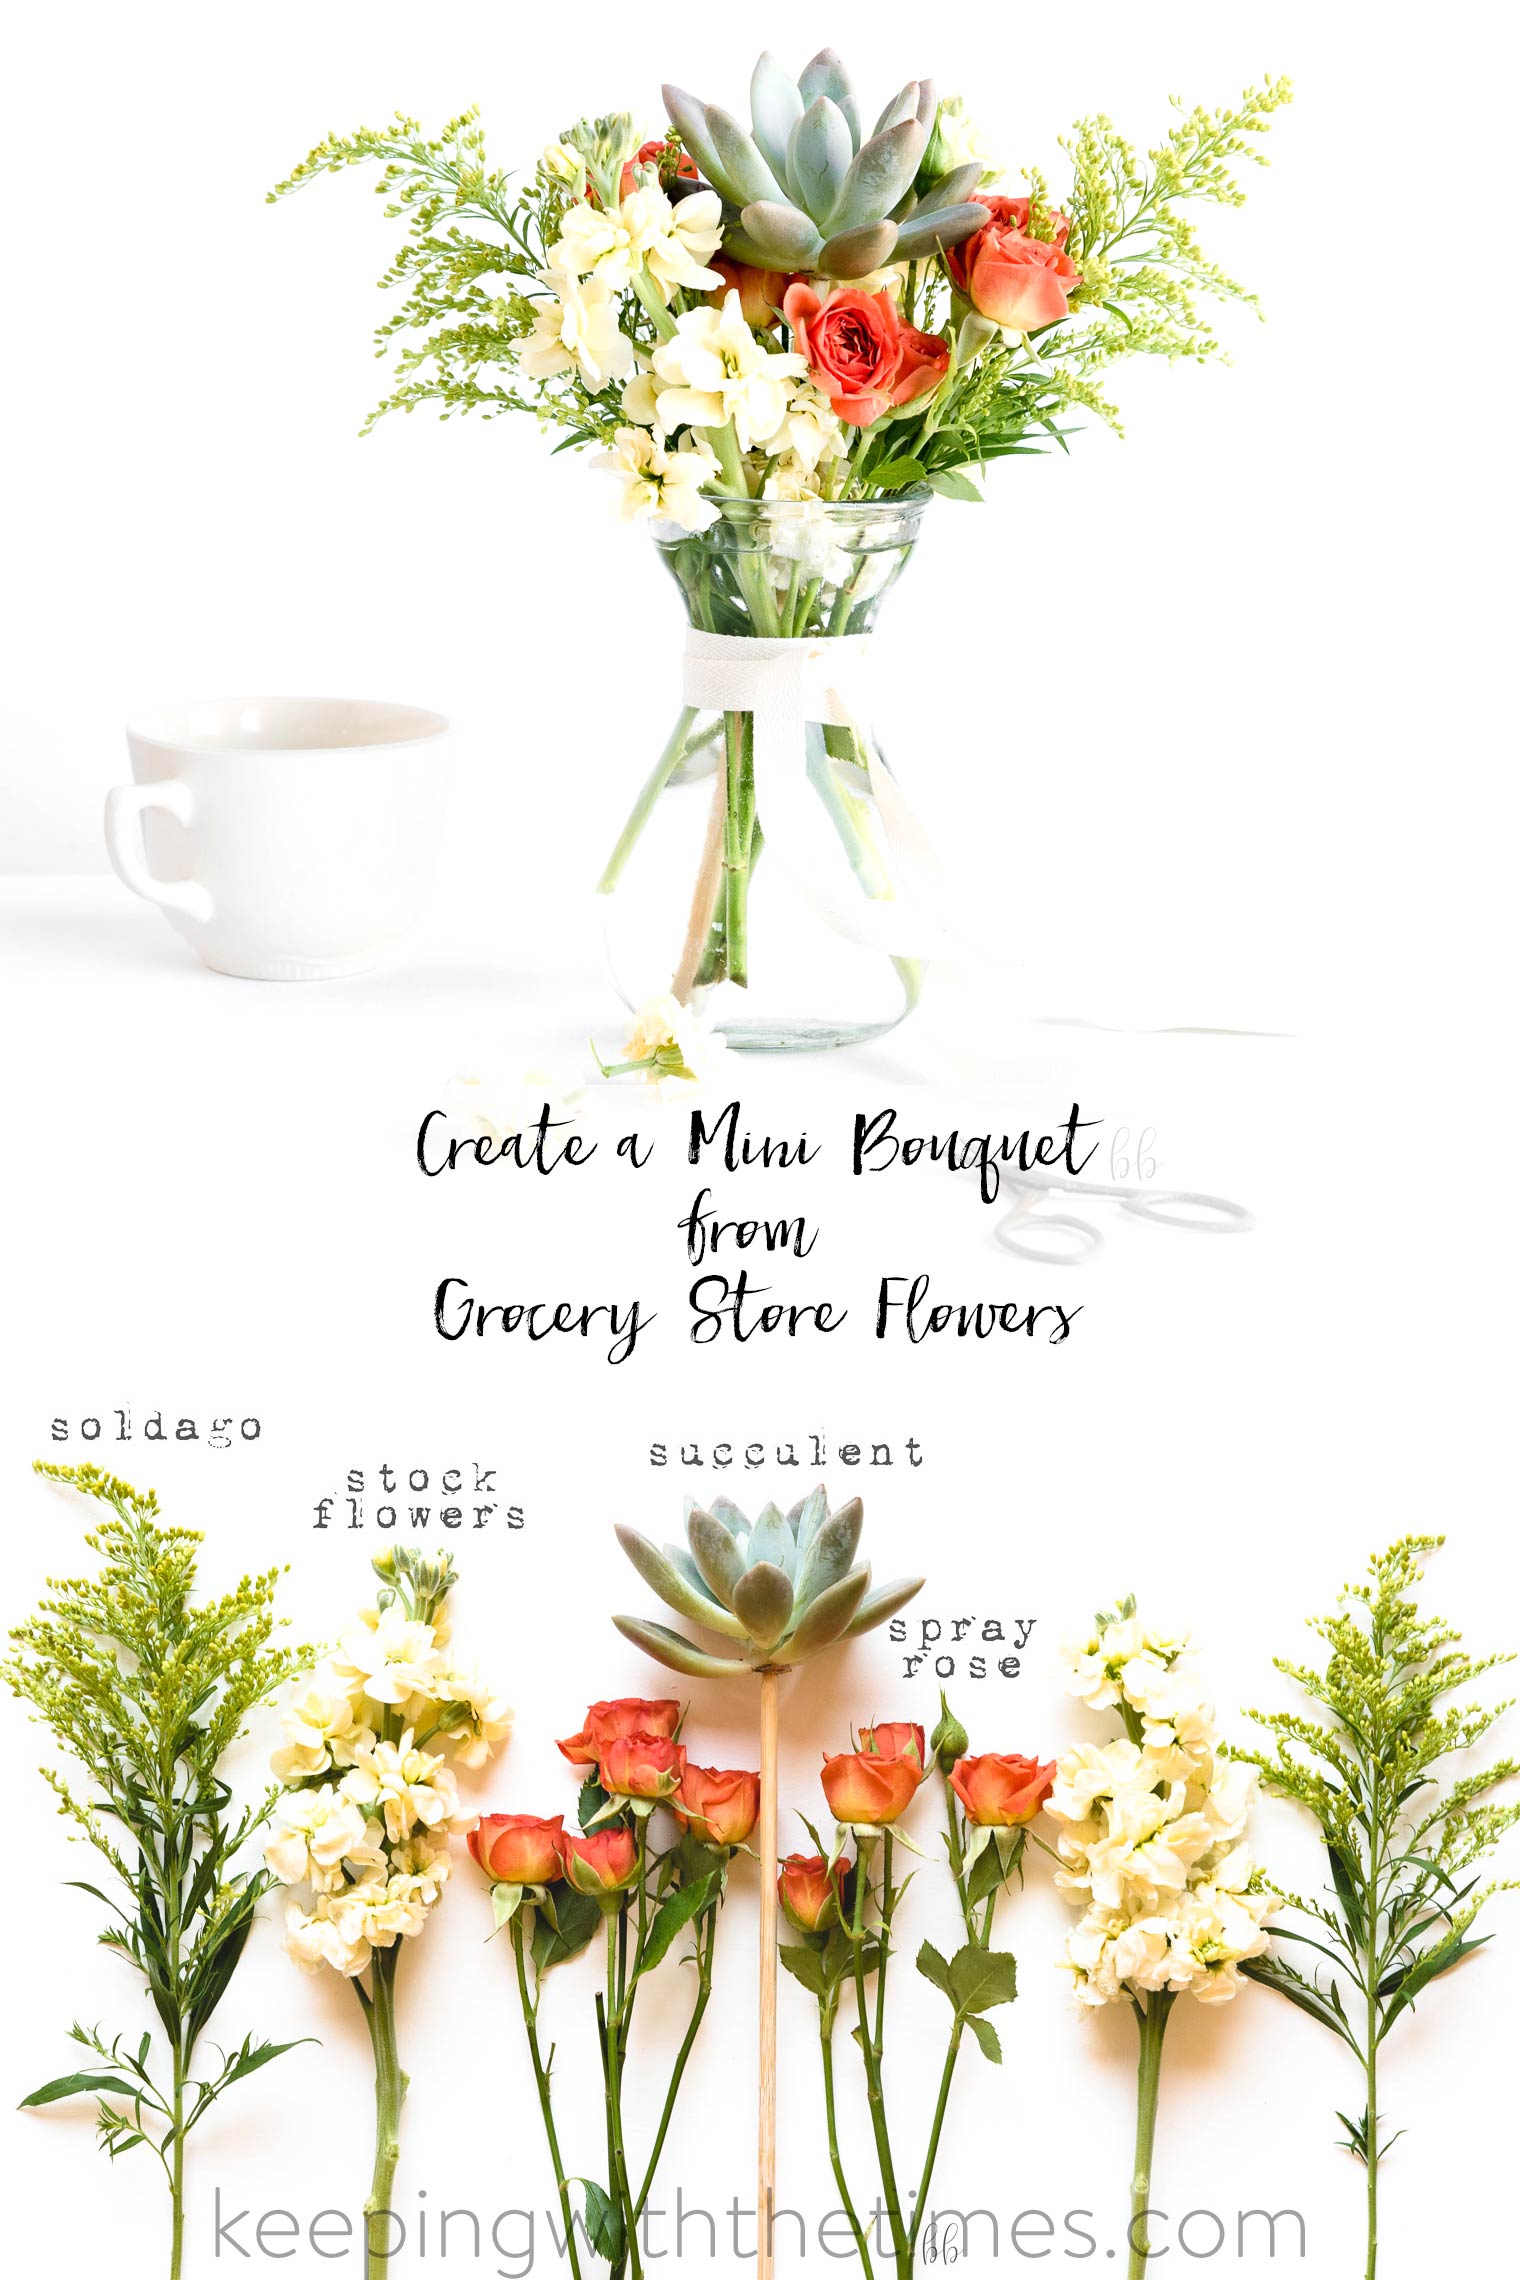
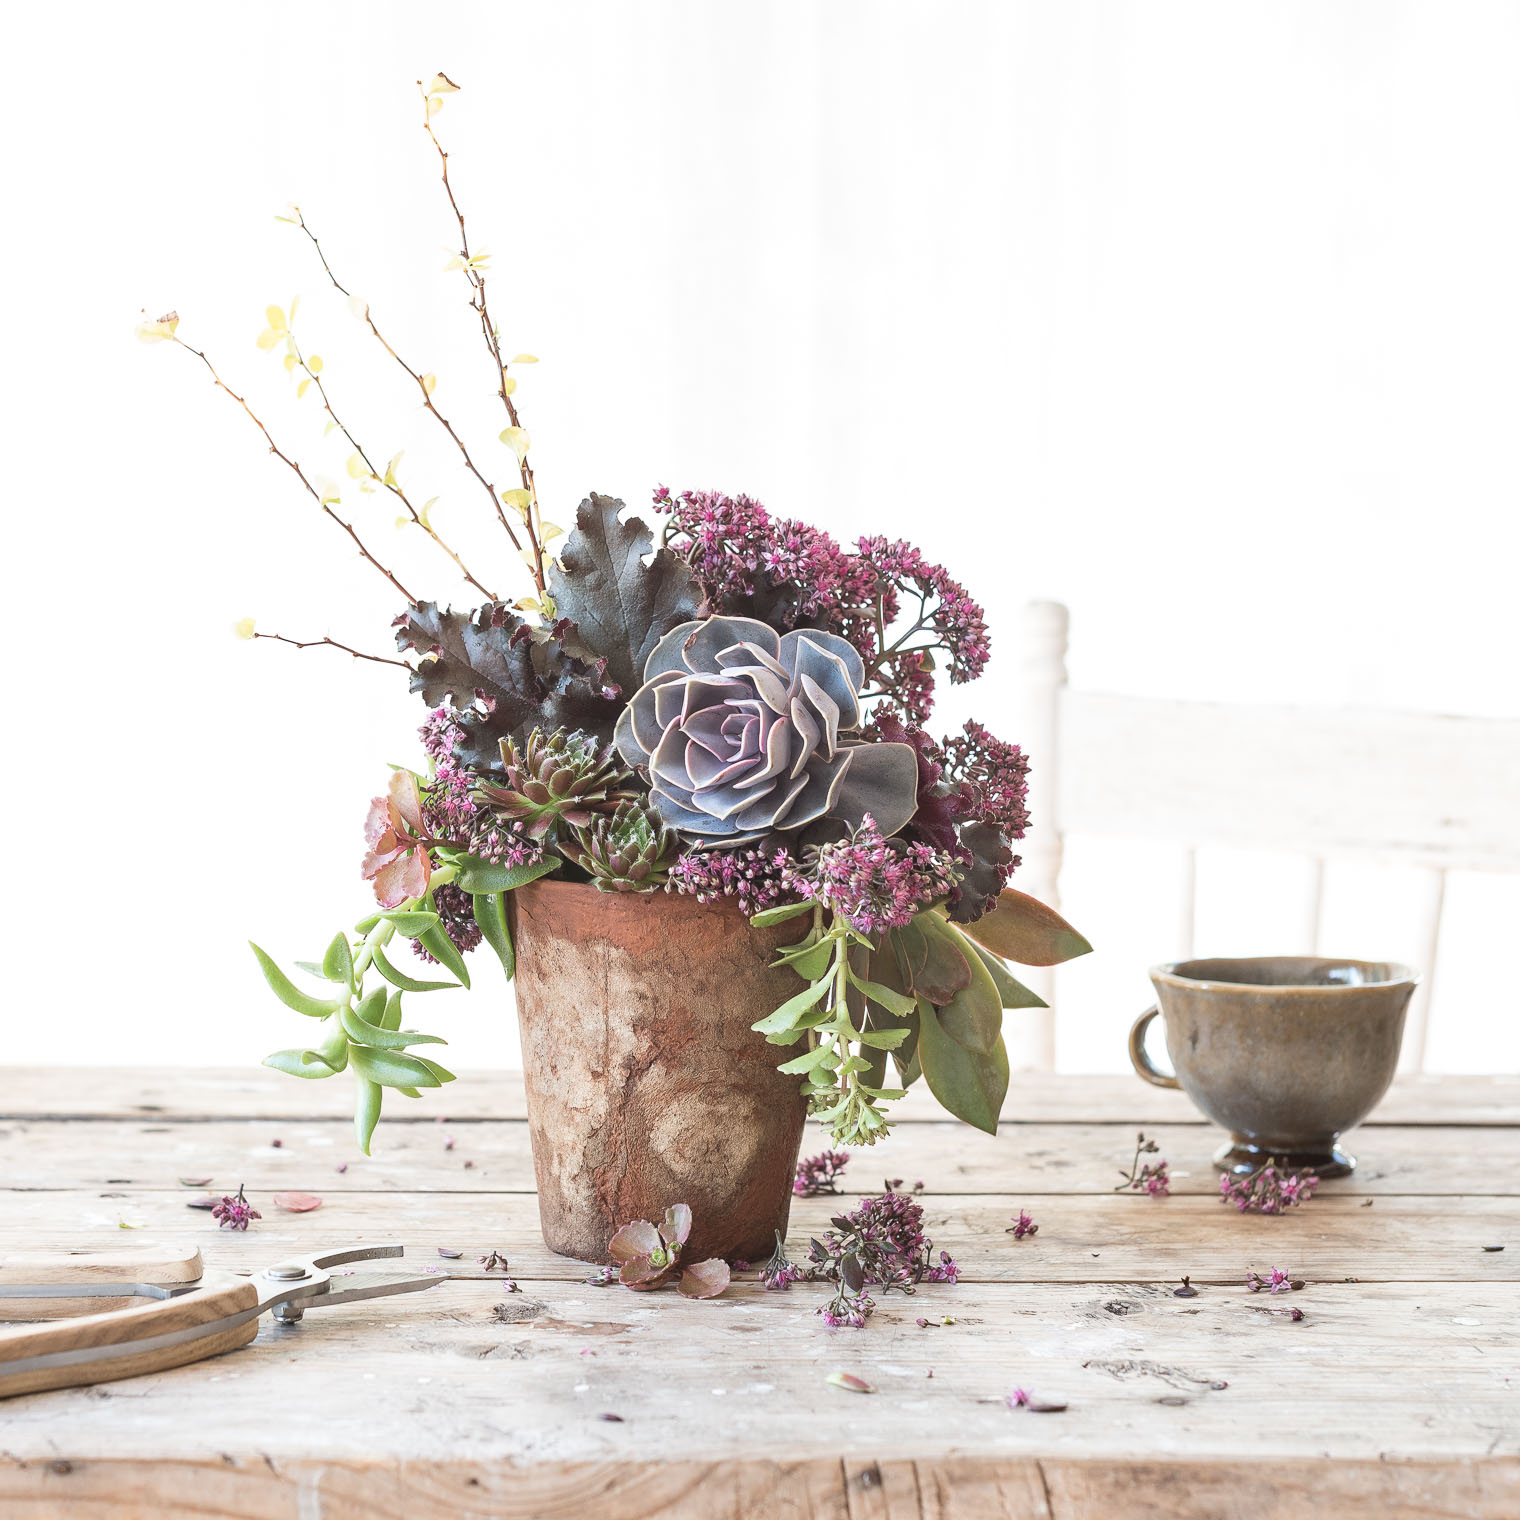
I snipped off the top of a succulent that had gone extremely leggy and weird (the one that looks like a rose.)

It was dangling on a shoot about 7 inches from the pot … so quirky. I thought why not since I will enjoy it more indoors in a bouquet, where it looks gorgeous (not weird), and it will last for weeks! truly!

The purply flowery plant is a sedum just beginning to bloom. I will tell you right now, I’ll always have sedum either in my garden, or in pots … it gives and gives and always looks beautiful (plus it’s a late summer to autumn bloomer.)

I added a couple Heuchera (Coral Bell) leaves since I adore their dark dramatic frilly leaves. Note to self: always have Heuchera in garden.

A prickly branch in the top left, and another dangly succulent in the bottom right creates a diagonal line through the arrangement.

Then I thought … hmmm … what else could I do with this? What if I didn’t have a large succulent rosette …

Well, I could insert a sweet begonia, or even a rose (if I had one.) I also added a couple lovely Dracaena spikes from one of my pots.

Late Summer Arrangements #1, The Succulent/Sedum Sensation, Keeping With the TimesTo make this arrangement I chose a wabi sabi terra cotta pot and put a mason jar filled with water inside. I covered the top of the mason jar with chicken wire to help hold the stems securely. Tip: most succulents don’t even need to be in water! Some of the little ones you see are simply sitting freely on top.

This would make a wonderful autumn centrepiece for Thanksgiving!

Late Summer Arrangements Idea #1, Succulent Sedum Sensation, Keeping With the Times

Late Summer Arrangements Idea #2 Beautiful Bouquet Garni

Late Summer Arrangements Idea #3: Heavenly Hydrangea

Filed Under: FLORAL DESIGN Tagged With: backyard bouquet, flower arranging, sedum, succulents

Easy Floral Arranging Tip

July 23, 2016 by Barb 11 Comments

Today I have an easy floral arranging tip for you!

Last summer I was up early enjoying a hot cup of coffee, and playing with my wildflower bouquet before another busy day began. I always love this quiet time so much!

wildflower-posy-barb-brookbank-3101

Floral Arranging Tip

Did you know you can arrange a bouquet by laying flowers on a flat surface?

  • Start with the tallest flower and spread out in a fan shape.
  • Add a middle layer of another, shorter flower.
  • Place the focal flower at the base.
  • Gently scoop it all up and place in a vase … so simple!!

Floral Arranging How-To, Keeping With the Times

I have a guide book Alberta Wayside Wildflowers by Linda Kershaw, which not only identifies wildflowers, but also suggests how many a person should pick, which is very helpful to know:

Blanketflowers: a few
Oxeye Daisies: freely
Red Clover: freely

Thank you for stopping by! Have a wonderful weekend!

Easy Floral Arranging Tip, Barb Brookbank, Keeping With the Times

PIN IT

floral-arranging-tip


Filed Under: FLORAL DESIGN Tagged With: backyard bouquet, flower arranging, wildflower

Backyard Bouquets

June 10, 2016 by Barb 5 Comments

It’s that time of year where my whole yard is bursting with flora and fauna just begging to become backyard bouquets!

This week the lineup includes these two perennials: Bachelor’s Button and Globeflower. Are they not stunning? And both are prolific this year; the Bachelor’s Button is popping up everywhere. I mean, I knew it was an enthusiastic plant but I really had no idea … it’s moved into our boreal forest. Some people would say that may not be a good thing, but let me tell you the bees would not agree!Backyard Bouquets, Keeping With the Times
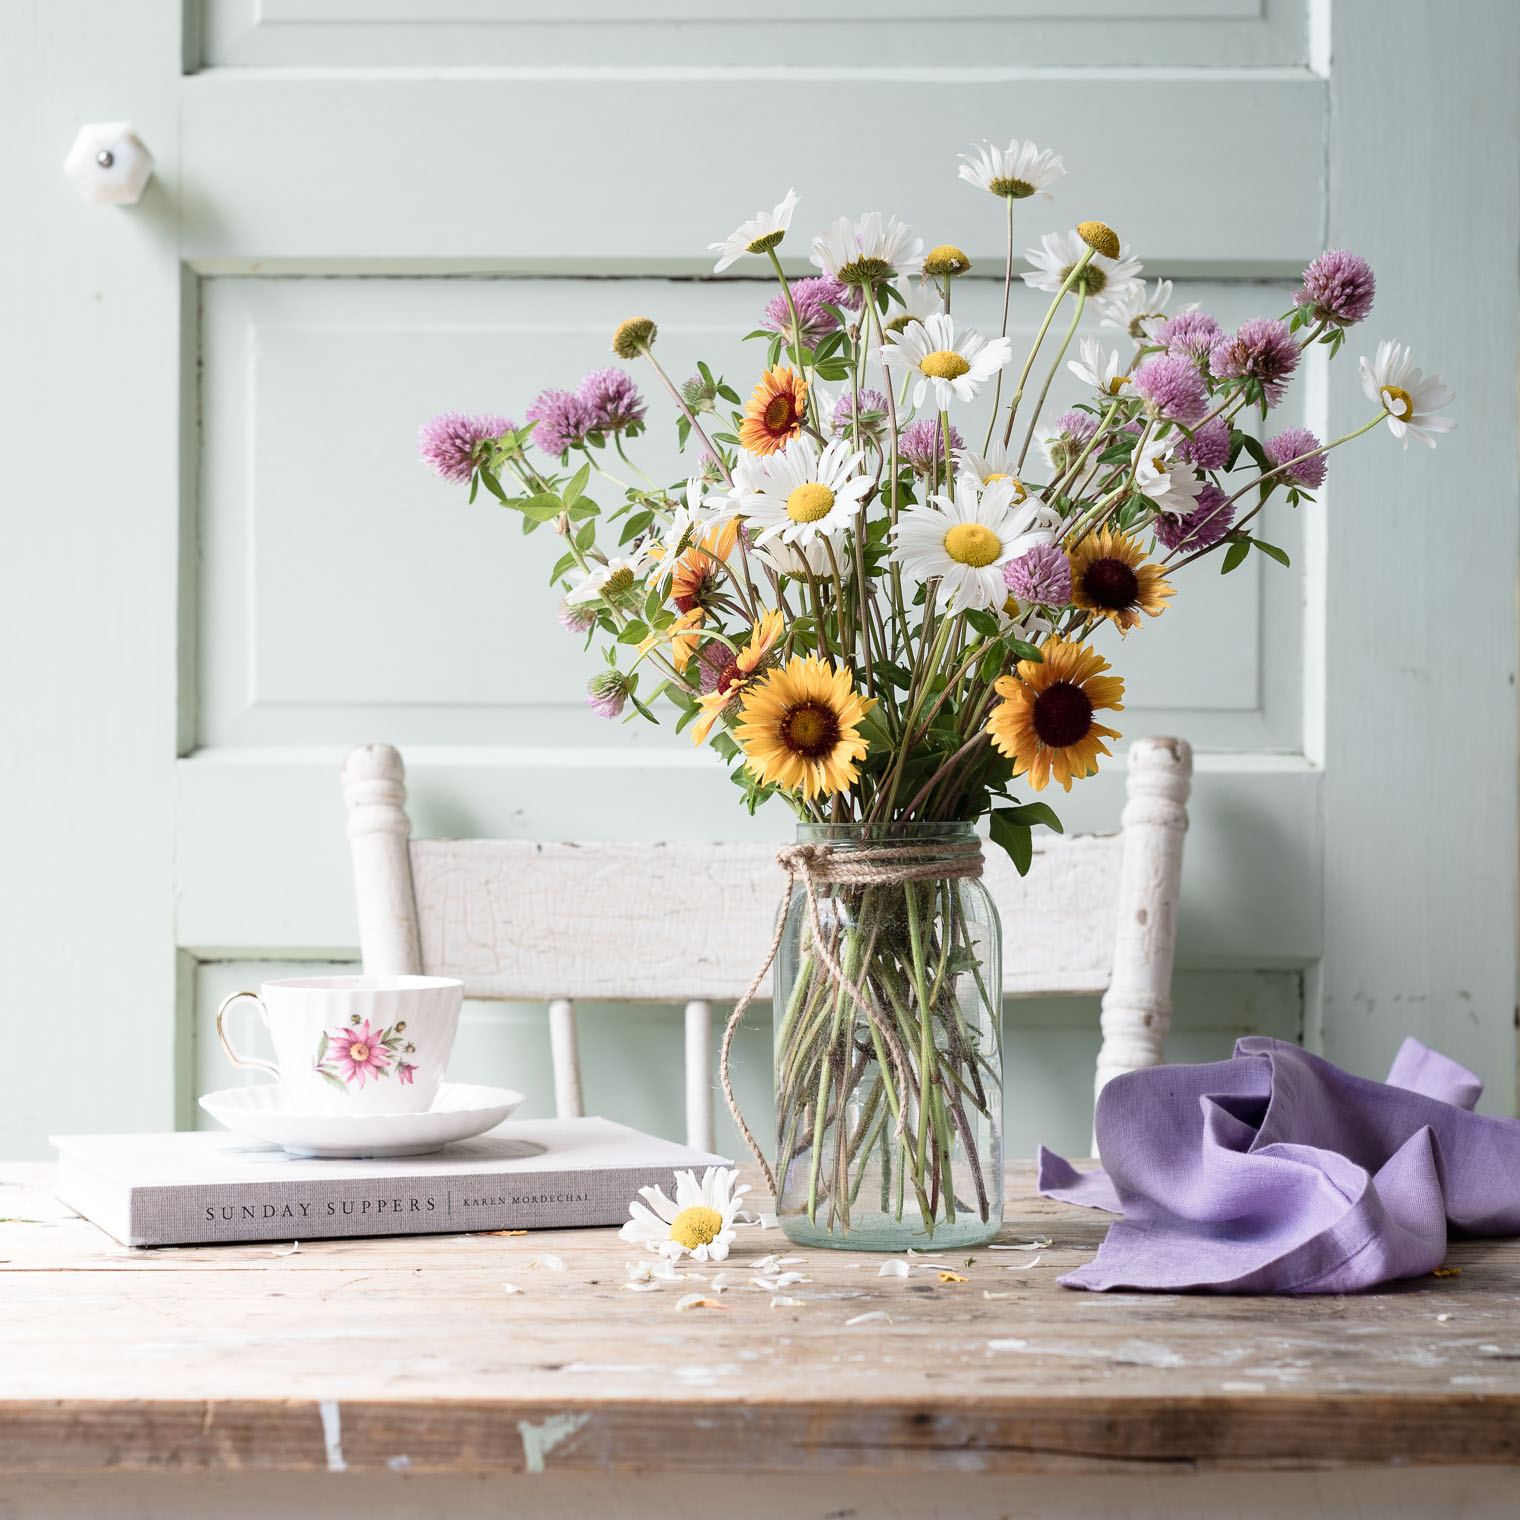
I’m not the only one who loves it. I posted a few pics on IG and it sparked a conversation. Someone said they cut theirs right back after the first bloom to promote a second wave. Hmmm, I’ll be out there with my shears in about a week!

To make this posy:

  1. Pick flowers early in morning and put in water immediately. Let them drink for about an hour.
  2. Recut all stems.
  3. Strip almost all leaves off Bachelor’s Buttons.
  4. Lay Bachelor’s Buttons on table, arrange Globeflowers on top.
  5. Tie loosely with string and place in a tall vase.
  6. Watch the Globeflowers twist and turn ;)
  7. Keep out of direct light.
  8. Recut stems and refresh water daily.

On another note, I discovered a few things when I sat down to write this post.

  • I do have things to write about.
  • I learned the proper spelling of Bachelor’s Button, and that what I was calling Buttercup is really Globeflower. Actually, I knew it was Globeflower, but I forgot! It was given to me by a friend many, many years ago, and her name is Eleanor.
  • As I was trying to remember the real name, it led me back to my favourite gardening books by Lois Hole. She was an incredible woman who, among other things, wrote a series on northern gardening; from flowers, to bulbs, to trees. In “Perennial Favourites” I’ve ticked off all the flowers I’ve ever had, as well as who gave them to me! It’s a treasure. I unearthed a treasure this morning.

Have a wonderful weekend my friends, and I hope you’ll join me in my new series “Backyard Bouquets” to see what other treasures I unearth!


xo

Filed Under: FLORAL DESIGN Tagged With: bachelor buttons, backyard bouquet, flower arranging, globe flowers

Trader Joe’s Flowers Deconstructed

May 5, 2016 by Barb 13 Comments

Trader Joe’s flowers are so gorgeous, and I’m drawn to them like bees to honey … or flowers ;)

I can always find something seasonal, and a bit unique, and when I saw a bunch with a succulent on top, whoa, better than a rose I say!

Trader Joe's Flowers, Keeping With the Times, Barb BrookbankI can’t remember what exactly was in the little Trader Joe’s bunch I purchased (sorry), but it kinda went like this …Trader Joe's Flowers, Keeping With the Times, Barb Brookbank
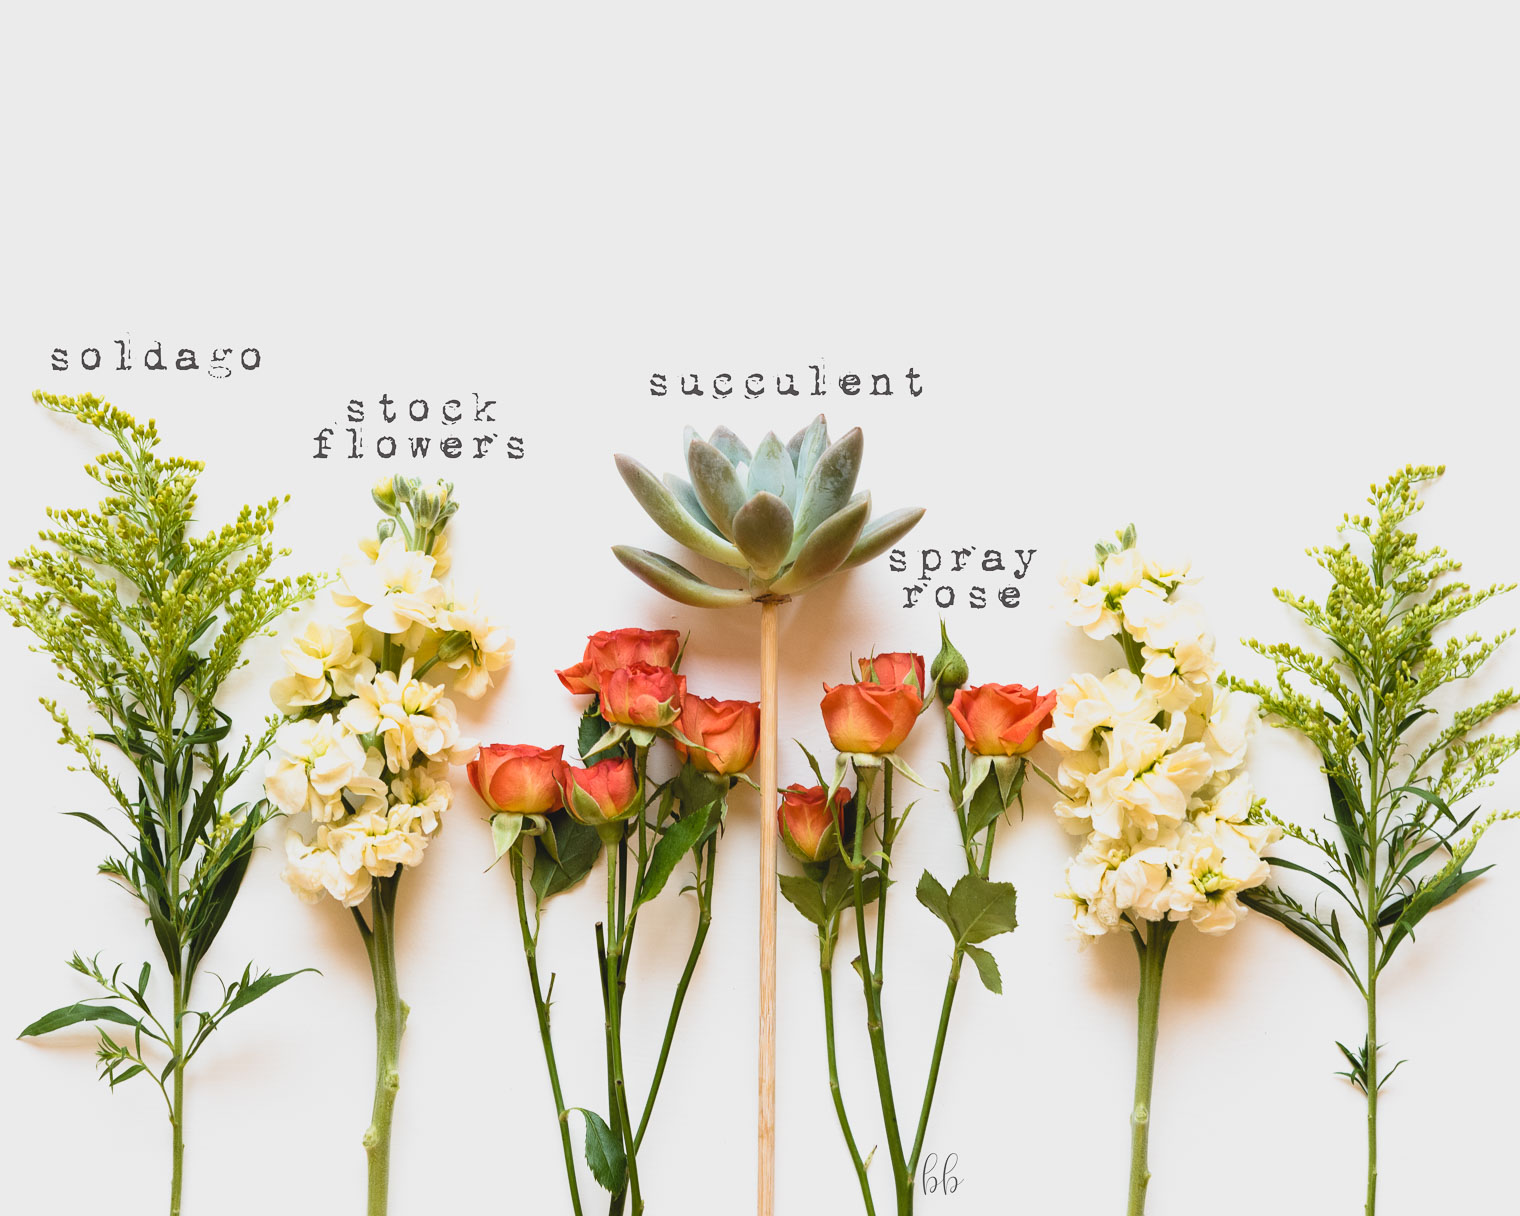
… so in the actual bunch there was:

  • 1 succulent tip (stabbed onto a skewer and then hot glued … I think)
  • 4 off-white stock (since they are bulky, I only used two)
  • 2 soldago (solidago)
  • 2 bunches spray roses

and each stem was approximately 20 inches in length. And all for $12.99.

How to Prepare and Arrange your Trader Joe’s Flowers

  • When you get your flowers home, remove from wrapper, recut about an inch off all stems, and place in a fresh bucket of water. Let them sit and fluff up for a half hour or so.
  • Choose a vase and fill with cold water, mixing in the flower food that usually comes with the flowers.
  • Cut stems on the diagonal with a sharp knife to the length that you want your final bouquet to be. Remove all foliage that would be under water. Also remove excess or damaged foliage near the top. This lets the flowers shine and take centre stage.

For my mini bouquet, since my bud vase is 6 inches in height, I cut my flowers in varying heights:

  • Soldago: 11 inches
  • Succulent: 10 inches (be careful not to touch the succulent leaves as it will damage what is called the “bloom” and leave unsightly scuff marks)
  • Stock: 9 inches
  • Spray roses: 6-7 inches

Insert soldago on opposite sides of the vase.

Add two stock on opposite sides, fill in with spray roses and add succulent last … ta da! Easy peasy.Trader Joe's Flowers, Keeping With the Times, Barb Brookbank

PS … this is not a sponsored post … would that it was ;)

Oh, but have you seen my Mingle Magazine giveaway? Contest ends May 8th.

mingle-giveaway-barbbrookbank

PIN IT

Trader-Joe's-Flowers

Sharing with:

The Inspiration Gallery at Craftberry Bush

Filed Under: FLORAL DESIGN Tagged With: backyard bouquet, flower arranging, succulents, trader joe's

August: Inspiring Reverence or Admiration

August 1, 2014 by Barb 9 Comments

It’s August! Did you know it’s the only month this year to start on a Friday? Cool interesting fact!

Did you know that the Gladiolus is the birth flower for August?

I wasn’t really aware of that as I picked up a bunch of these stately flowers. I felt a bit guilty paying money for them but, hey … they cost $5.00 and I won’t be seeing them at this price for another year.

Gladiolus, August, Keeping with the Times

noun

AUgust

1.the eighth month of the year, containing 31 days.

adjective

auGUST
1. inspiring reverence or admiration; of supreme dignity or grandeur; majestic: an august performance of a religious drama.
2. venerable; eminent: an august personage.

Gladiolus, August, Keeping with the Times

So that’s what I found this week. I’m going to treat this month with the respect and dignity it deserves.

Have a wonderful weekend!!

Filed Under: PHOTOGRAPHY Tagged With: flower arranging, flowers, friday finds, gladiolus, photoshop, still life

How to Care for Freshly Cut Hydrangeas

January 28, 2013 by Barb 65 Comments

I have a few tips on how to care for freshly cut hydrangeas which hopefully you’ll find helpful.

This as been one of  my most popular posts, and one of my most debated hot topics! Everyone has an opinion on the best way to care for them. I posted this on HomeTalk and there were 21k views and 47 comments! (side note: I don’t use HomeTalk anymore … do you?)

I don’t have home grown hydrangeas, so I have to rely on grocery stores or Costco (which is where I found these.) There were four in the package and although they looked fresh, they appeared to be scrunched up a bit. After humming and hawing for 10 minutes, I finally decided to shell out the ridiculously low price of $8.00 (it’s almost a crime, really) and just get them.

When I got home, I had to do a little research on how to care for these amazing flowers. I knew enough to re-cut the stems (on a slant) but what I didn’t know was that they are the most water-lovin’ flowers you will ever find!

How to Care for Freshly Cut Hydrangeas, Keeping With the Times, Floral Tips and Tricks

How to Care for Freshly Cut Hydrangeas, Keeping With the Times, Floral Tips and TricksHow to Care for Freshly Cut Hydrangeas

  • cut the bottom of the stems off while under water (use garden shears) – this prevents a bubble from forming and hindering the uptake of water
  • poke several holes in the stem with a needle (I used a nail)
  • fill a vase to the brim with cold, cold water – add a handful of ice cubes! isn’t that weird? but apparently hydrangeas love cold water
  • add the flower food that is usually included – if you don’t have flower food you can use 1 Tbsp sugar with 1tsp bleach
  • add the hydrangeas and let them fall into place
  • spritz the flower heads with more water

How to Care for Freshly Cut Hydrangeas, Keeping With the Times, Floral Tips and Tricks

After following all these directions, I was rewarded with big fluffy blooms that lasted for days and days!

Do you have any tips or tricks when it comes to hydrangeas?

Filed Under: FLORAL DESIGN Tagged With: flower arranging, how-to, hydrangea, hydrangeas

Welcome! I'm Barb, and this is where I practice my mantra to "learn something new, try something different". It's my hope that something I do here may inspire you! Read More…

Categories

Archives

Copyright 2020 * Keeping with the Times * All rights reserved.