 I’m pretty sure most of us know that our images need to be re-sized before uploading to the web. The photo needs to fit within the width of your blog, and it needs to load fast or you will lose readers. True story.
I’m no expert on this subject, but I found a great article at photoshopessentials.com which gives an in-depth look at why, and how to do it. It’s very informative and enlightening and explodes a few myths about size, resolution, etc.
However, I thought I’d go over how I do it and show you how to write an action to automate this task. One click of a button and your image is re-sized and saved in a folder. Perfectly sized and hard for someone to steal it for printing purposes, although they could steal it and use it for the web, but that’s just not cool.
Actions can only be written in Photoshop, but don’t despair, I have a little surprise for you and you’ll find it at the end of this post.
Since Photoshop CC has a bit different dialog box, I wrote this action in CS6. So here we go:
How to Write an Action in Photoshop to Re-size and Save Images for Your Blog
To start with, make sure you have a folder created where you want to save your re-sized images.
- Open a photo that you have already adjusted exposure, white balance, and cropped etc. Make sure all your edits are complete before re-sizing.
- From the Actions panel, make sure that Button Mode is not checked. Actions can’t be written in Button Mode.
- Click on the down-facing arrow and choose New Action. In the Dialog box, type in the name you want to use for your action. I’m using the name “Resize and Save for Web”.
- Choose Default Actions as the Set. This will save the Action in the Default set (of course). You can create your own sets, but I won’t go there right now.
- Choose None for the Function key, and choose a Color if you like. This will give the Action a Color when in Button Mode. For this Action, I did not choose a color.
- Click Record. Everything you do from now until you press the Stop key will be recorded. It doesn’t matter how long you take, PS will sit there and wait all day if it has to so you can go slow and make sure you take only the steps that you want recorded.
- In the Menu Bar, choose Image > Duplicate, and click OK.
- Choose Image > Image Size.
- Make sure that Scale Styles, Constrain Proportions, and Resample Image are checked.
- Click on the down-facing arrow and choose Bicubic Sharper (best for reduction).
- Set the Resolution to 72 Pixels/Inch.
- For the Pixel Dimensions, set the Width. I set the width to 760 Pixels/Inch because that is the maximum width for images that will fit on my blog. Yours will most likely be different. Accept the Default Height to maintain proportions. Click OK.
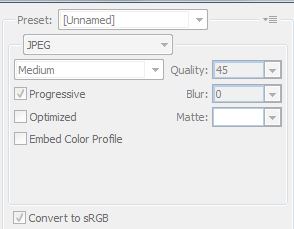
- In the Menu Bar, choose File > Save for Web. Choose JPEG, Medium with a Quality of 45. Click Progressive. I left the rest of the settings at the Default. Click Save.
- Navigate to folder where you want to save your re-sized images. Accept the default name of your image. If you give it another name, the action will save every image with that name and of course will end up overwriting every image you run the action on.
- Close the duplicate image, then close the original image (do not save the changes).
- Click the Stop key.
Here are the final Pixel Dimensions for my image. Notice that the file size went from 28.7M to 1.11M. The other thing to note is that I do not touch the Document Size dialog box when re-sizing. It gets reduced automatically.

Clean as a whistle and faster than a speeding bullet!
But the fun part today is my little give-away! I will write a custom action for the first 10 people who comment. I can only record it to the point of re-sizing the image since I can’t create a path to a folder on your computer. Once you run this action on an image, you will have to then save it yourself.
If you want a custom action, make sure you say so in the comments, and make sure that I can contact you.
You give me the info – I give you the action!
Want a few more tips on Photoshop? Check out my page “Photoshop Tips”!
Have a wonderful Sunday!
That’s fabulous Barb! I use an action to resize but have mine set where the save for web dialog opens and I can adjust the size. Recently I read that to deter stealing that your image shouldn’t be larger than around 300k. So I try to do that too. You are a doll for doing this for your readers! Has a blessed day. Hooe you didn’t come to too much snow.
Thank you, Roxi! I’m glad you brought that up. The 1.11M indicates the size of the file. If you were to check the size of this image at the Save for Web point, you would see that it is 84.5K, which is way under the 300K (obviously :)) I like the idea of stopping the action to adjust the size. Thanks so much for stopping by!
Oh that’s good to know. I just realized I skip that step and go straight to Save for Web.
I sure could use that helper! I keep a Web folder on my desktop to hold the re sized images. This way I know they are reduced and I do not back that up. You come up with such great ideas.
Hi Annette! Shoot me an e-mail with the width size that you need. What program do you use?
Thank you so much for this tutorial! I need to learn more about the Photoshop actions, I have just read about them but have not tried to use them yet! That would be a great time-saver … I’ll give it a try!
This is great, Barb! I think when I return from our trip next week, I’m going to take the plunge and get a Creative Cloud membership. I’ve saved this post in my tutorials folder. And I love the idea to save resized photos separately so as to not clog up your drive. Thank you!
Hi Dotti! I know you will love CC!
I love the information you share. Thank you for that, I do re size for the web in most cases and did go over your information. I will again and maybe by chance I can do one of my own actions that is a go to for me. Thanks again Barb.
I will be away now until mid March. . Stay safe and warm.
Have a wonderful time, Lisa!
oh and I m off to the web page you put in your blog also. Great tips over there. Thanks again. .. You might see me pop up on IG. :)
Love your post about making an action Barb, and I would love one of yours!! I’m not always faithful at resizing for web, so this would make a sure way to always quickly do that. Great tips, and link for more details. Thank you so much!
Hi Beverly! Awesome! shoot me an email with how wide you want your finished image.
Oh, I love this! I am so lazy when it comes to resizing, but having an action that will do it in one click . . . well, I think I can manage that! We’ve been having this discussion over at Focusing on Life and about how to help prevent your images from being copied. This fits right in and I’ll pass it along to the rest of the group. Like Dotti, I’ve decided to take the Creative Cloud plunge and will be doing that in the next few days. Then I can set up my resizing action! Thanks so much, Barb. I know this is going to save me so much time.
Oh, I forgot to say that I would LOVE for you to write me a custom action! You know where to find me!
Hi Terri – send me an email with how wide you want your finished image to be!
Woohoo! I want one!
All I have to say is that you are amazing :)
Hi Luisa – just let me know how wide you want them!
Barb, I am sorry to take this space but I would love to ask you some questions about this post….I don’t see your email on your blog so would you send it to me…Mine is
nancythomaswilliamson@yahoo.com thanks….
Nancy, you are not “taking up space”!! :) This is something I have to research and will get back to you.
This is great information! If I’m still in the first 10 would you do one for uploading scrapbook pages? I don’t have a web site.
Thanks. Love your blog and info and tutorials at Digital Scrapper.
Hi RuthAnn! Lovely to hear from you! I will create one for you – what size do you want? 600×600, or 700×700? Or do you work with 8 1/2 x 11?
Thanks!
Barb
Thanks for the great tips on this post Barb. Hope things are going well in your parts. I’ve been a little busy as of late so I haven’t been able to check in on your site. I hope things are going well and that you have a great week.
Barb, great tips! You’re such a pro! My skills at post-processing images are so basic compared to yours. Love the screenshots – very helpful!