Keeping With The Times

living, learning, and keeping with the times

  • Home
  • About
  • Site Information
  • Privacy Policy

Autumn mantle love

September 25, 2011 by Barb 25 Comments

I’ve decorated my mantle and house for autumn and Thanksgiving (our Thanksgiving is in October). The weather has been nice but it won’t be long until it gets quite chilly and it will start getting dark earlier and earlier. That’s where these bright colours and sparkly lights and candles come to the rescue. I kept a few things from my spring inspired mantlescape but I added some new elements plus some things I already had around the house. For my mantle I decided to try the (fake, battery operated candles). I have straw and leaves scattered all around and now I don’t have to worry about burning the house down! I admit that they aren’t romantic, but they do add some sparkle and I have come to like them. The other thing is, that I have real candles on the hearth and the coffee table so I think the combination works – at least it does for me.

cozy
my homemade millet topiaries
simple elegance
I kept my heron
new vases (from HomeSense) filled with oats
oats gathered from a nearby field (goes with my rustic country wreath on my door)
my antique decoy – centre stage
my banister – all colourful and twinkly
. . .  a friendly little bird I found at my country store . . .
. . .  couldn’t get just one . . .

So there you have it, my simple autum mantle. I started with a trip to HomeSense because I know they have seasonal decorations and I wanted a new picture (my winter moose just wasn’t going to cut it). I also bought new candle holders, potpourri to fill my glass vases, a wreath, and some candles. I added two new brown vases and filled them with oats, then stood back and was happy with what I saw: my house – looking very twinkly, inviting and colourful! a celebration of autumn and Thanksgiving!

Filed Under: DIY AND CRAFTS, HOME DECOR Tagged With: autumn, mantel

Simple country topiary

September 14, 2011 by Barb 19 Comments

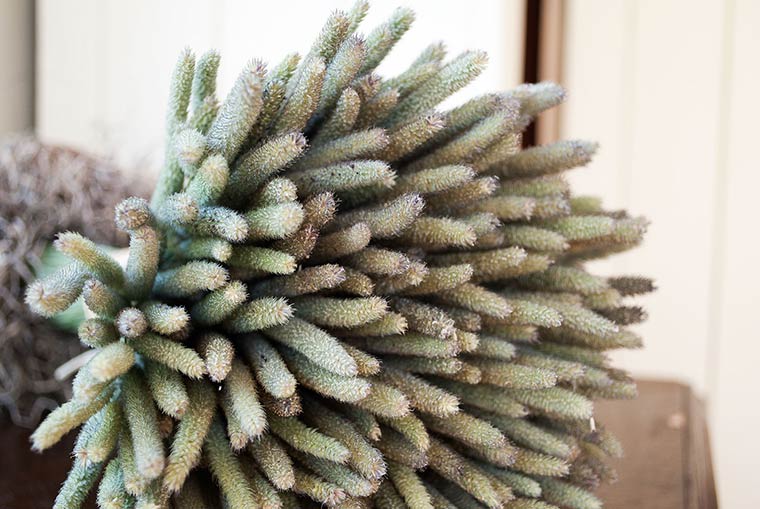
This plant which I think is millet grows in the ditches around my yard. Every July I pick a bundle, dry it, and fashion it into a sort of topiary-style arrangement. I’ve made dozens of these and given a few to my daughters. I’m always delighted to see that they are displaying them and that they look quite nice, perched either on their mantles or tables or end tables. They are so easy to make but bring an element of simple country elegance to your house.

Dried Topiary Tutorial

Dried Topiary Tutorial

Here’s a quick and easy tutorial:

Pick the millet, tie it into bunches and hang from a hanger until dry (1 month or so).

Dried Topiary Tutorial

Dried Topiary Tutorial

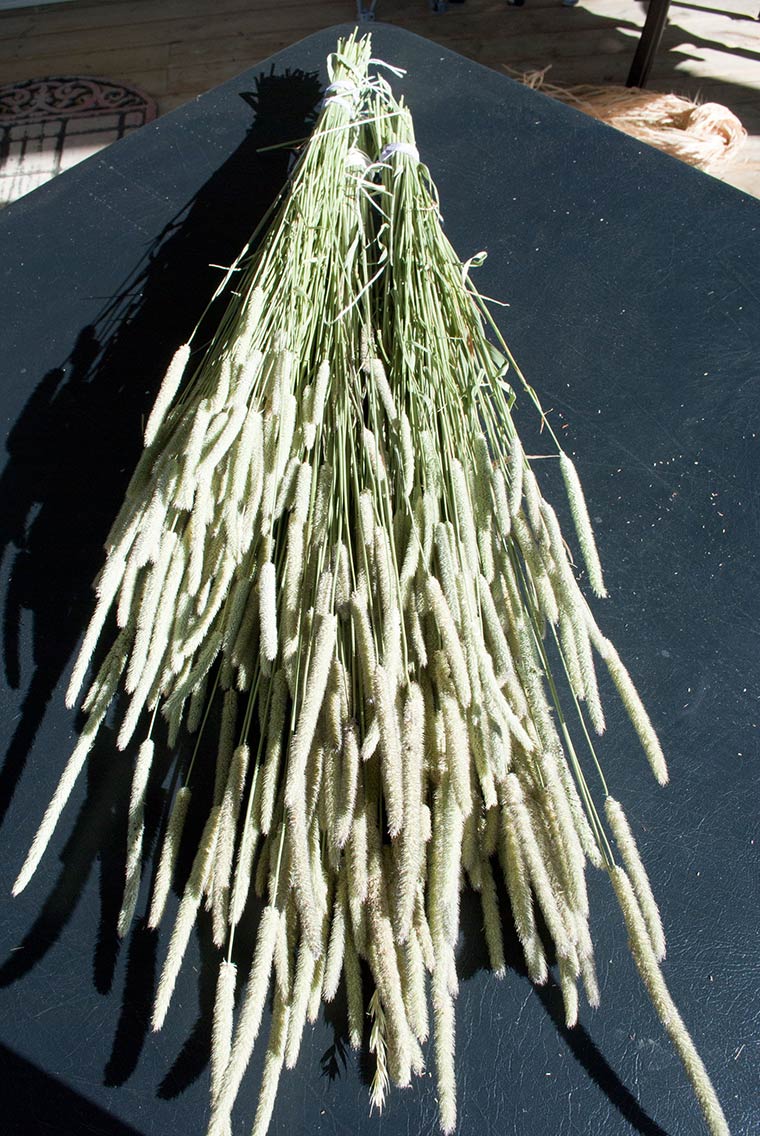
Strip off leaves and arrange in an even bunch secure with elastic bands and cut stems at bottom.

Dried Topiary Tutorial

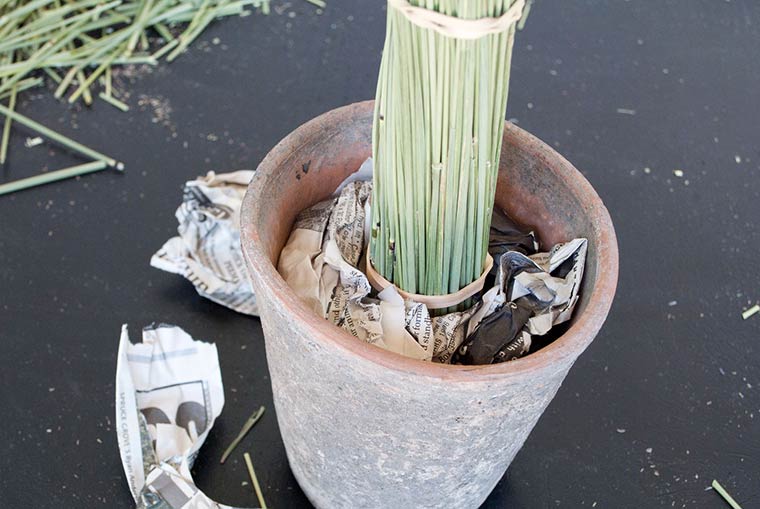
Insert into rustic container and pack tightly with newspaper add some sphagnum moss voila!

20110907_4390-copy

20110907_4391-copy

Total cost, since I had all the material on hand from other projects over the years: $0.00! How much more frugal can you get?

Filed Under: DIY AND CRAFTS, HOME DECOR Tagged With: autumn, mantel

Rustic, Country, Whole-Grain Wreath

September 4, 2011 by Barb 57 Comments

At the beginning of each season I like to create a wreath from materials that I’ve gathered while out and about in the countryside. wreath, autumn, oats, grains

autumn oat wreath

Since we live in a rural setting, what better material could I choose than some kind of grain…

…OK yes, I may have strayed from the ditch to the edge of a farmers field of oats…

hmmmm . . . I hope they don’t notice when it comes time to count the grains after harvest . . .

Autumn-Oat-Wreath-1

A car went by, and I had to hide…

Autumn-Oat-Wreath-10

autumn oat wreath

Here’s a little tutorial:

Start with a straw-based wreath (available at most craft stores). Take small batches of oats (cut stems short) and wrap with twine, heavy thread or as I used, floss!

As you add each batch it covers up the first one. I wrapped my wreath twice – here you can see that the whole wreath is covered but I’m starting a new layer. I didn’t use any glue whatsoever.

Autumn-Oat-Wreath-4

autumn, oat, wreath, diy

Create two (or more) sprays by laying a bunch of oats opposite each other and securing in the middle with floral wire.

autumn, oat, wreath

Use floral picks to anchor the sprays to the bottom of the wreath, then wrap wire around both the sprays and the wreath.

Autumn-Oat-Wreath-6

Autumn-Oat-Wreath-7

Tie with some kind of bow – I used a simple rustic piece of burlap and voila! you have your wreath.

Autumn-Oat-Wreath-8

Autumn-Oat-Wreath-9


Filed Under: DIY AND CRAFTS Tagged With: autumn, wreath

An explosion of pussy willows!

April 25, 2011 by Barb 23 Comments

Every spring I go out into the countryside and gather pussy willows. I create these wreaths as soon as I get enough gathered and while the branches are fresh and pliable – it’s amazing how durable they are when fresh.

I used to sell these wreaths at craft fairs and one year I had them all sold before I even got into the building! as I carried them in, people in the parking lot snapped them up – it was crazy. However, I don’t sell them anymore, I just give them as gifts to a very few select people!

Pussy Willow Wreath

Pussy Willow Wreath

Pussy Willow Wreath

Pussy Willow Wreath Tutorial

The ‘how to’ is really very simple. Start with a purchased 18″ willow wreath base. It doesn’t have to be the best kind – actually the looser the base the better since all you do is start stuffing the branches into it! There is no glue or wire involved – the pussy willows themselves hold the wreath together if you stuff in enough. I have never had one fall apart and when I’m tired of it I always end up pulling the branches out and it isn’t easy.

Start by inserting branches from the left and from the right to form the beginning of a spray at the bottom.

Pussy Willow Wreath

Continue to add branches to the spray, building up the middle.

Pussy Willow Wreath

Pussy Willow Wreath

Add the rest of the branches from the bottom up towards the top until they meet at the top.

Pussy Willow Wreath

I went over the top with my wreath and crammed in branches until I couldn’t cram in any more – why not! it’s over the top, but fun!

I would caution you, however, to start smaller and that you periodically hang it where you are going to put it to make sure it fits – it’s better not to have to trim it after the fact since it removes the wild looking branch ends.

And lastly, it’s wonderful while fresh but if you hang it where it isn’t going to be bumped it will practically last forever.

Filed Under: DIY AND CRAFTS, HOME DECOR Tagged With: pussy willow, spring, wreath

« Previous Page

Welcome! I'm Barb, and this is where I practice my mantra to "learn something new, try something different". It's my hope that something I do here may inspire you! Read More…

Categories

Archives

Copyright 2020 * Keeping with the Times * All rights reserved.